Discover the simple joy of brewing kombucha at home with this easy-to-follow guide, saving money and customizing flavors to your liking.
Kombucha, that tangy, fizzy, probiotic-rich drink, has taken the world by storm. But the price tag can be a bit steep. What if you could brew your own kombucha at home, customized to your taste and for a fraction of the cost? This guide will show you how, step-by-step, from acquiring your first SCOBY to bottling your delicious homemade brew.
Table of Contents
Getting Started: Acquiring Your SCOBY
- The SCOBY (Symbiotic Culture of Bacteria and Yeast): This is the heart of kombucha brewing. It looks like a pancake-shaped, rubbery disc, and it’s what ferments the tea into kombucha.
- Buying a SCOBY: The easiest way to start is to buy a SCOBY online or from a local homebrew shop. This guarantees a healthy, active culture ready to brew.
- Growing Your Own SCOBY: You can grow a SCOBY using a bottle of unflavored, raw kombucha. It’s a longer process but incredibly rewarding. Look for bottles that say “raw” or “unpasteurized” as these contain live cultures.
Brewing Your First Batch of Kombucha
- The Tea: Start with plain black tea. It provides the ideal food source for the SCOBY. Avoid flavored teas or herbal infusions for your first batch. You can experiment with different tea types later on.
- The Sugar: White sugar is the best option for your initial brew. The SCOBY needs this to feed on and create the kombucha. Refined sugar is preferred as the SCOBY thrives on it.
- The Process: Brew a strong batch of tea, dissolve the sugar completely, and let it cool to room temperature. Pour the sweetened tea into a clean glass jar, add your SCOBY and some starter liquid (kombucha from a previous batch or from the bottle you used to grow your SCOBY), cover with a breathable cloth secured with a rubber band, and place it in a warm, dark place for about 2-4 weeks.
- Patience is key: The first fermentation (F1) takes time. Don’t worry if nothing seems to be happening at first. The SCOBY needs time to acclimate and begin working its magic. Be patient and resist the urge to disturb the brew.
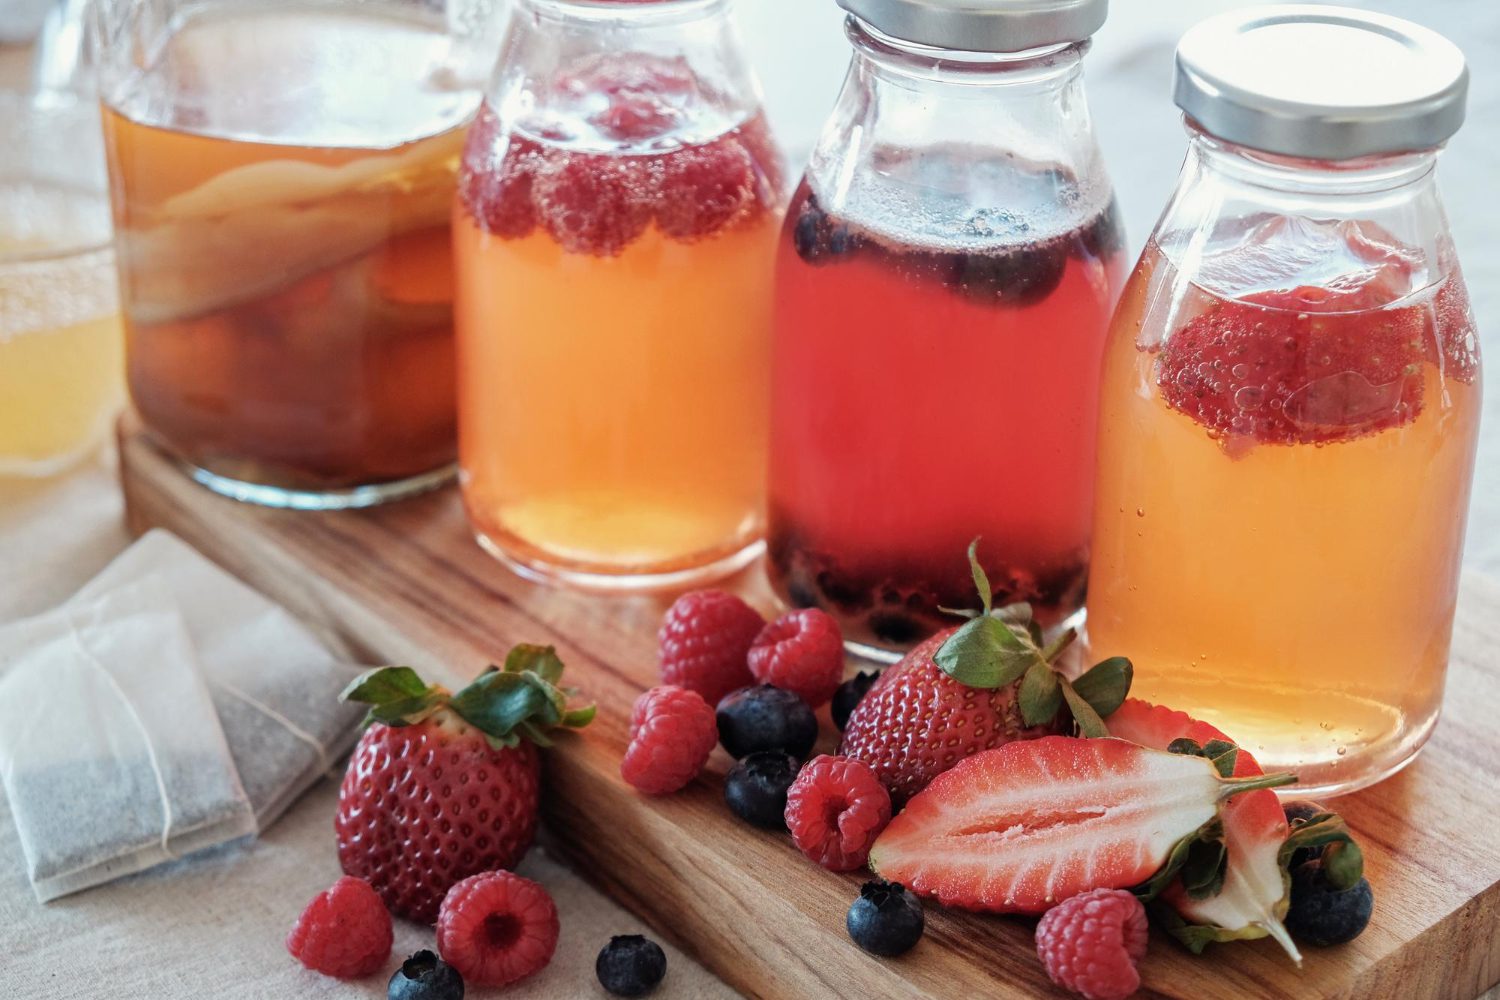
Flavoring and Bottling (Second Fermentation)
- The F2 Process: Once your kombucha reaches your desired tartness (usually 2-4 weeks), carefully remove the SCOBY and about a cup of kombucha (to use as starter liquid for your next batch). Pour the kombucha into bottles, leaving about an inch of headspace.
- Fruit: Add your desired fruits, herbs, or spices to the bottles. Popular choices include berries, ginger, pineapple, and mint. Get creative and experiment with different combinations.
- Bottling and Carbonation: Seal the bottles tightly and leave them at room temperature for 1-3 days for the second fermentation (F2). This will create carbonation and enhance the flavors. Remember to use bottles designed for fermentation to prevent explosions.
- Refrigeration: After F2, refrigerate the bottles to slow down fermentation and enjoy your fizzy, flavorful kombucha!
Troubleshooting Common Kombucha Problems
- Mold: If you see fuzzy, colorful mold (different from the SCOBY, which is usually smooth and off-white), discard the batch and start over. Ensure proper sanitation and a healthy SCOBY to avoid mold growth.
- Weak Carbonation: Make sure you’re adding enough sugar during the F2 process to feed the yeast and create carbonation. You can also try fermenting at a slightly warmer temperature.
- Vinegary Kombucha: This means your kombucha has fermented for too long. Try tasting it earlier during the F1 process to find your preferred level of tartness. Reduce the fermentation time in warmer temperatures.
Continuing Your Kombucha Journey
- Continuous Brewing: Once you get the hang of it, you can set up a continuous brew system, allowing you to have kombucha on tap all the time.
- Experimenting with Flavors: The sky’s the limit when it comes to flavoring your kombucha. Try different fruits, herbs, spices, and even fruit juices. You can also experiment with different tea types like green tea or oolong.
- Sharing Your Booch: Kombucha is a great gift! Share your homemade brew with friends and family and spread the kombucha love.
- Joining a Kombucha Community: Connect with other kombucha brewers online or in your local area for tips, advice, and inspiration. Sharing experiences with others can enrich your kombucha brewing journey.
Brewing kombucha at home might seem daunting at first, but it’s surprisingly simple. With a little patience and practice, you’ll be enjoying your delicious, homemade kombucha in no time. So, grab your SCOBY, brew some tea, and embark on this exciting fermentation adventure. Cheers to your healthy, homemade booch!
How to Make Kombucha at Home: A Simple Step-by-Step Guide
- Equipment: 1-gallon glass jar, cloth cover (cheesecloth, coffee filter, etc.), rubber band, smaller jar for starter tea, bottles for bottling
- Ingredients: SCOBY (Symbiotic Culture of Bacteria and Yeast), starter tea (from a previous batch or from a trusted source), black or green tea, sugar, water
- Step 1: Brew the Sweet Tea: Boil about 4 cups of water. Add 1 cup of sugar and stir until dissolved. Add 4-6 tea bags (black or green tea work best). Steep for 5-10 minutes. Remove tea bags.
- Step 2: Cool the Tea: Pour the sweet tea into your 1-gallon jar. Add cold water to fill the jar, leaving about an inch of space at the top. The tea *must* be cooled to room temperature or lukewarm before proceeding. Hot tea will kill the SCOBY.
- Step 3: Add the SCOBY and Starter Tea: Gently place the SCOBY into the cooled sweet tea. Pour in 1-2 cups of starter tea (unflavored kombucha from a previous batch). This creates the acidic environment the SCOBY needs to thrive and prevents mold.
- Step 4: Cover the Jar: Cover the jar with the cloth cover and secure it tightly with a rubber band. This keeps out fruit flies and other contaminants while still allowing air to circulate.
- Step 5: Ferment: Place the jar in a dark, room-temperature location (ideally 70-80°F) for 7-30 days. The fermentation time depends on the temperature and your desired level of tartness. Start tasting after 7 days.
- Step 6: Taste Test: After 7 days, start tasting the kombucha daily. When it reaches your desired tartness, remove the SCOBY and about 1-2 cups of kombucha for your next batch (starter tea).
- Step 7: Optional Second Ferment (for Flavor): If desired, add fruit, juice, or herbs to your bottles and then fill them with the kombucha. Seal tightly and leave at room temperature for 1-3 days for a second fermentation. This creates carbonation and adds flavor.
- Step 8: Refrigerate: After the second ferment (or after the first ferment if skipping the second ferment), refrigerate the kombucha to slow down fermentation and enjoy!
Common Questions About How to Make Kombucha at Home
Q: What is a SCOBY?
A SCOBY (Symbiotic Culture of Bacteria and Yeast) is the essential ingredient for brewing kombucha. It’s a rubbery, pancake-like culture that naturally ferments sweet tea into tangy, fizzy kombucha.
Q: Where can I get a SCOBY?
You can get a SCOBY from a friend who brews kombucha, buy one online, or grow one yourself from a bottle of unflavored, unpasteurized kombucha. It will naturally form a new baby SCOBY on top.
Q: What kind of tea should I use for kombucha?
Plain black tea is a great starting point, but you can also use green tea. Avoid flavored or herbal teas, as the oils can disrupt the fermentation process and the SCOBY won’t grow naturally.
Q: How long does it take to brew kombucha?
The fermentation time varies depending on temperature and your taste preference, typically 7-30 days. The kombucha naturally becomes more tangy and less sweet the longer it ferments.
Q: How do I know when my kombucha is ready?
Taste it! When it reaches your desired level of sweetness and tartness, it’s ready. It should have less sweetness than the initial sweet tea and have a slightly tangy, naturally fizzy quality.