Quick Answer: Unlock the Magic of Beginner Fermentation
Ready to kick off your fermentation journey? It’s a simple, delicious adventure, we promise! For beginners, here’s the secret sauce: prioritize super clean equipment, always use non-iodized salt, and, most importantly, keep those veggies happily submerged in brine. The core steps are straightforward: prep your produce, whip up a perfect 2-3% salt brine, pack your jars with purpose, and then just let them do their thing for 5-14 days at a cozy 65-75°F (18-24°C). This process isn’t just safe; it creates unbelievably delicious, probiotic-rich foods, making beginner fermentation totally accessible and enjoyable for everyone. Let’s get started!
Table of Contents
- Quick Answer: Unlock the Magic of Beginner Fermentation
- The Microbe Magic: Fermentation Science, Simplified
- Beyond the Brine: Unlocking Fermentation’s Health Harvest
- Fermentation Fundamentals: Safety First, Flavor Always
- Your First Ferment: Crafting Crisp, Tangy Carrots
- The Unsung Heroes: Salt and Water in Fermentation
- Beyond Basic Brine: Unleashing Your Inner Fermentation Artist
- From Jar to Plate: Enjoying & Storing Your Fermented Treasures
- Fermentation Fixes: Your Troubleshooting Toolkit
- Watch the Magic: Fermenting Carrots Step-by-Step Video
- Your Fermentation FAQs: Demystifying Common Questions
- Your Fermentation Journey: A Delicious Beginning
- Important Health & Safety Information
The Microbe Magic: Fermentation Science, Simplified
Ready to unlock the secret world of microbes? For many taking their first time fermenting, understanding the basic science makes all the difference. These fermentation tips for beginners will illuminate the simple, yet profound, principles behind your delicious homemade probiotics. It’s not nearly as complicated as it sounds, we promise!
Lacto-Fermentation: The Tiny Chefs Working Wonders
At the very heart of most easy ferments like sauerkraut and kimchi is a process called lacto-fermentation. Don’t let the name intimidate you! It simply means that naturally present beneficial bacteria, primarily from the Lactobacillus family, get to work. Think of them as tiny, tireless chefs feasting on the sugars in your vibrant vegetables, converting them into tangy lactic acid. This isn’t just a clever trick of nature; it’s what gives your fermented foods their characteristic bright, pleasantly sour flavor and makes them rich in live, active cultures that contribute to a healthy gut microbiome. You’ll literally taste the microscopic magic!
Salt: The Unsung Hero of Your Ferment
Salt is far more than a seasoning in fermentation; it’s a critical player in fermentation safety and success. When you add non-iodized salt (a crucial detail for beginner fermentation!), it initiates osmosis, gently coaxing the natural moisture out of your crisp vegetables. This creates a brine – a salty liquid environment that’s a hostile zone for spoilage-causing bacteria, yet perfectly welcoming for our desired Lactobacillus friends. We typically aim for a 2-3% salt concentration by weight; this precise balance ensures the right microbes thrive, giving you consistently crisp, delicious results. It’s a fundamental step for safe fermentation practices for new learners, acting like a protective shield for your good bacteria.
The Oxygen-Free Party: Cultivating an Anaerobic Haven
To truly master how to start fermenting vegetables at home, you must understand the importance of an anaerobic environment. This simply means ‘without oxygen.’ Our beneficial Lactobacillus bacteria prefer an oxygen-free party, while pesky molds and spoilage organisms love oxygen. That’s why keeping your vegetables submerged under the brine is non-negotiable. Using a sturdy fermentation weight and a proper lid system (like an airlock or even just a standard lid kept slightly loose) are key answers to what do I need to start fermenting safely and successfully. This is one of the most vital fermentation tips for beginners to prevent common issues like fuzzy mold, ensuring your fermenting veggies stay vibrant and safe.
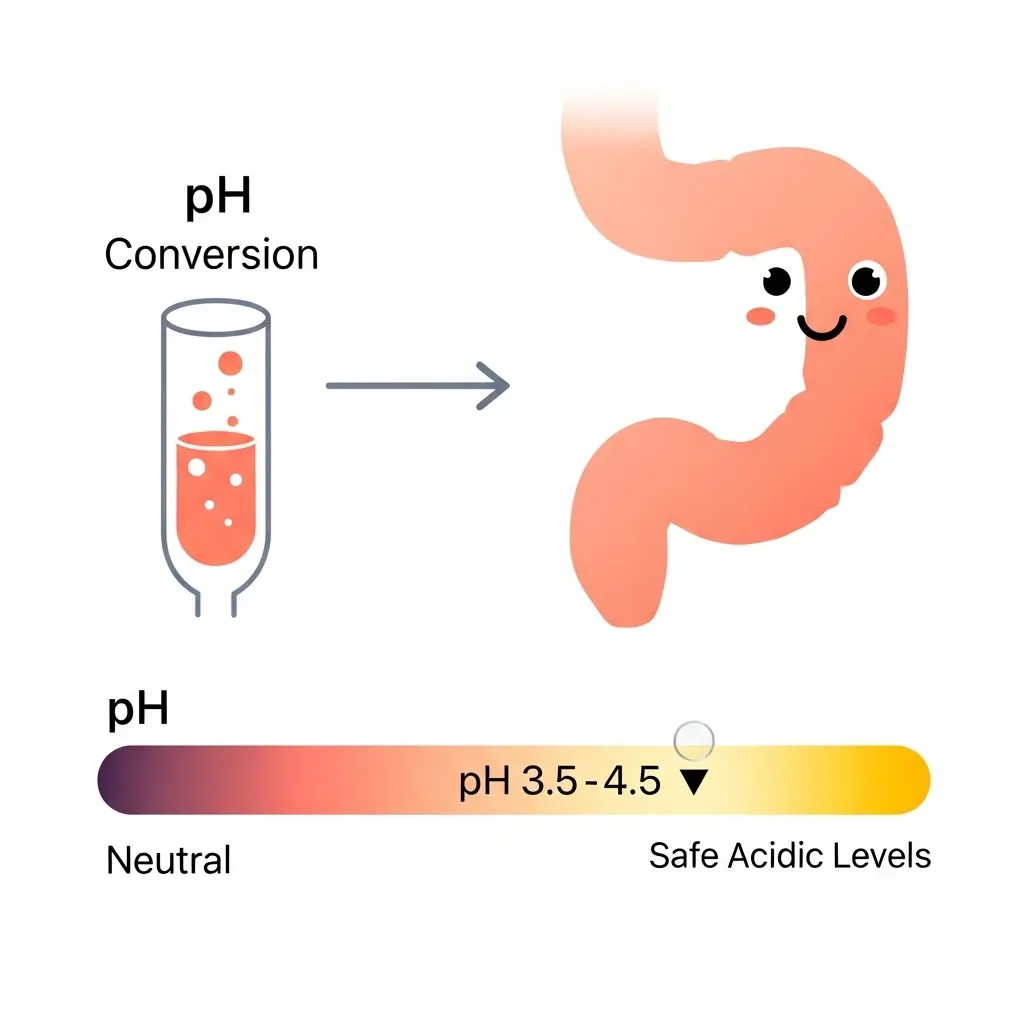
The pH Power-Up: Safety in Every Tangy Bite
As fermentation progresses, the lactic acid produced by our hardworking bacteria begins to lower the pH of your brine. This ‘magic of pH’ is key to both preservation and fermentation safety. Once the pH drops below 4.6, the environment becomes too acidic for most harmful pathogens, including the dreaded Clostridium botulinum. This natural acidification is why simple fermentation recipes for beginners are so inherently safe when done correctly. It’s a testament to the wisdom of this ancient practice, transforming fresh produce into a tangy, umami-rich food that’s safe and incredibly beneficial. If you’re ever troubleshooting beginner fermentation problems, a low pH is your ultimate sign of success – a delicious, sour victory!
Beyond the Brine: Unlocking Fermentation’s Health Harvest
Embarking on your fermentation journey is more than just learning new kitchen skills; it’s a significant step towards enhancing your well-being. At Fermention.com, we believe that understanding the profound health advantages of these living foods is one of the most compelling fermentation tips for beginners. When you master how to start fermenting vegetables at home, you’re not just creating delicious, tangy treats, you’re cultivating a concentrated source of nutrition and beneficial microbes that can support your health.
Probiotics: Your Gut’s Cheerful Crew
One of the most celebrated benefits of fermented foods is their rich content of homemade probiotics. During the lacto-fermentation process, naturally present Lactobacillus bacteria convert sugars into lactic acid. This doesn’t just preserve your vegetables; it populates them with living, beneficial bacteria that are crucial for a thriving gut microbiome. For first time fermenting enthusiasts, embracing these easy ferments means introducing a diverse array of these microscopic allies into your digestive system. These beneficial microbes help maintain a balanced gut ecosystem, which is foundational for overall health, supporting everything from mood to metabolism. Imagine a cheerful crew of tiny workers making your gut a happy, harmonious place!
Digestive Harmony & Nutrient Superpowers
The magic of fermentation extends to making your food work harder for you. The enzymatic activity of fermentation essentially “pre-digests” the food, breaking down complex carbohydrates and proteins. This means your body has an easier time absorbing the nutrients, leading to improved digestion. For many, consuming fermented foods can ease digestive discomfort and promote regularity, bringing a delightful sense of digestive harmony. Furthermore, fermentation can significantly increase the bioavailability of essential vitamins and minerals, such as B vitamins, vitamin K2, and various antioxidants. This makes your crunchy, tangy carrots or zesty sauerkraut not just tasty, but incredibly nourishing, offering enhanced access to the goodness within – truly nutrient superpowers! It’s why focusing on simple fermentation recipes for beginners is a fantastic way to boost your nutrient intake.
Your Gut, Your Shield: Boosting Immunity from Within
Did you know that a significant portion of your immune system resides in your gut? By fostering a healthy, diverse gut microbiome through the consumption of fermented foods, you’re directly supporting your body’s ability to defend itself. The beneficial bacteria found in homemade probiotics interact with your immune cells, helping to regulate immune responses and strengthen your natural defenses against pathogens. Think of your gut as your body’s inner shield, made stronger with every bite of delicious ferment. This makes learning safe fermentation practices for new learners not just about avoiding spoilage, but about ensuring you reap the full spectrum of immune-boosting benefits. While we always emphasize fermentation safety to ensure you’re consuming only the healthiest ferments, the reward is a gut that’s not just happy, but also a formidable ally in maintaining your health.
Ready to unlock these benefits? Discovering what do I need to start fermenting is your first step towards cultivating these beneficial, health-supporting foods in your own kitchen. You can do this!

Fermentation Fundamentals: Safety First, Flavor Always
Embarking on your fermentation journey is an exciting step towards creating delicious, homemade probiotics and embracing a healthier lifestyle. As first time fermenting can feel a little daunting, understanding fermentation safety is the absolute cornerstone of a successful and worry-free experience. These essential fermentation tips for beginners will build your confidence and ensure every batch of your easy ferments is perfectly safe and wonderfully flavorful.
The Golden Rule: Keep it Submerged!
The single most important rule in how to start fermenting vegetables at home is to always keep your vegetables fully submerged under the brine. This creates an anaerobic (oxygen-free) environment that allows beneficial lactic acid bacteria to thrive while preventing the growth of unwanted mold. Mold, which requires oxygen, can quickly spoil your batch, often appearing as fuzzy green or black patches. We use fermentation weights to keep everything tucked safely below the liquid line, ensuring your vegetables remain protected and your ferment stays clean and vibrant.
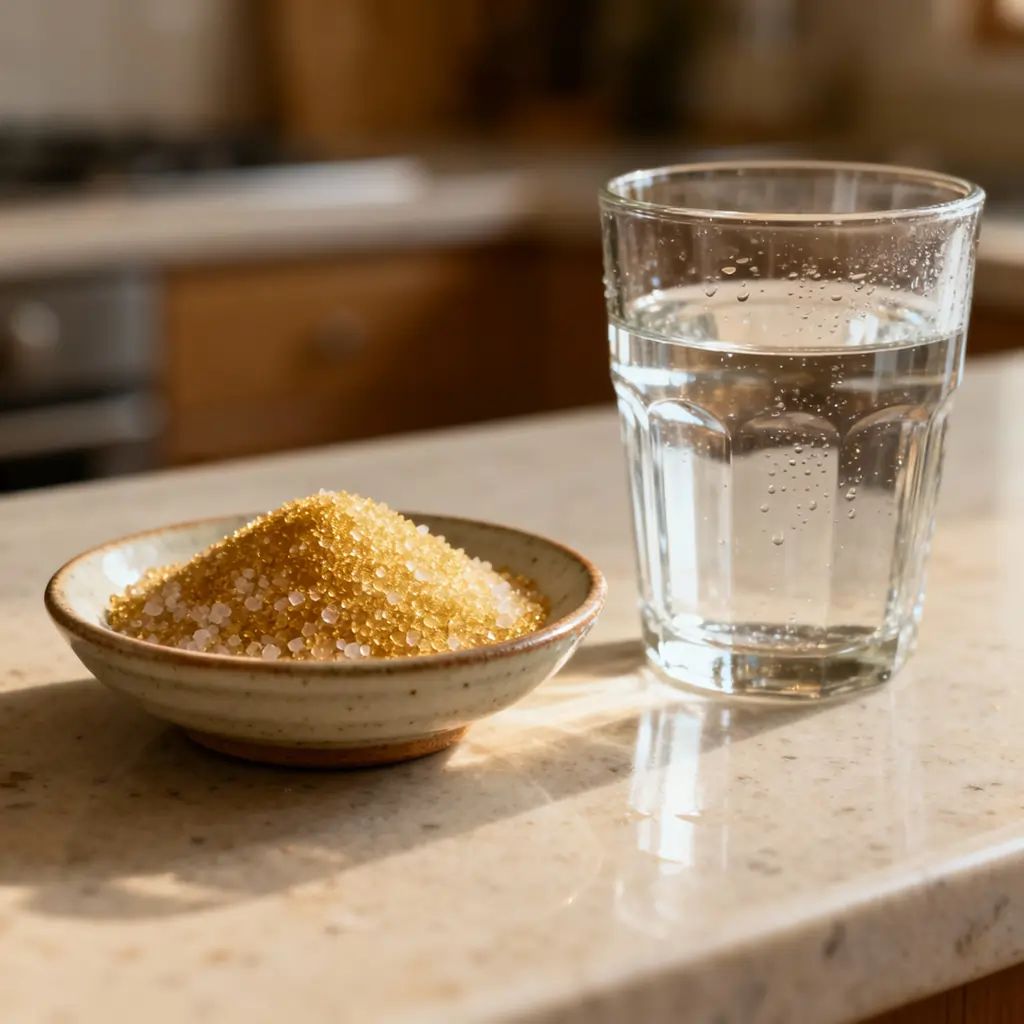
Salt Savvy: Why Non-Iodized is a Must
The type of salt you use is pivotal for successful beginner fermentation. Always opt for non-iodized salt like sea salt or kosher salt. Iodine and anti-caking agents found in regular table salt can inhibit the growth of the beneficial bacteria we want, leading to a stalled or failed ferment. For most vegetable ferments, a 2-3% salt concentration by weight is ideal. This means for every 1000g of vegetables and water combined, you’ll use 20-30g of non-iodized salt. Using a kitchen scale for precision is one of the best safe fermentation practices for new learners to guarantee consistent and safe results – a little salt savvy goes a long way!
Sparkling Start: Your Fermentation Foundation
Just like any cooking endeavor, cleanliness is key. Before you begin what do I need to start fermenting, ensure your wide-mouth glass jars, lids, and any tools (knives, cutting boards, fermentation weights) are thoroughly cleaned and sanitized. While we’re encouraging beneficial bacteria, we want to minimize any unwanted microbial guests that could compete or cause spoilage. A simple wash with hot, soapy water followed by a good rinse is usually sufficient for home fermenting. Think of it as preparing a sparkling clean stage for your microbial performers!
Whisper or Warning? Decoding Your Ferment’s Signals
One of the most common troubleshooting beginner fermentation problems is distinguishing between normal fermentation activity and actual spoilage. Learning to decode your ferment’s signals is a crucial skill.
- Good Signs: Expect your brine to become cloudy—this is a sign of active bacterial fermentation, a beautiful milky swirl! You’ll also likely see steady bubbling, indicating CO2 production, like tiny fizzy champagne. A thin, white, often wrinkly film on the surface, known as
Kahm yeast, is also normal. It’s harmless and can simply be skimmed off the top. Your fermented vegetables should smell pleasantly tangy, sour, or earthy, like good pickles – a fresh, clean aroma. - Bad Signs: Fuzzy mold is an immediate red flag. Any fuzzy growth, especially if it’s green, black, pink, or blue, means you must discard the entire batch. Do not try to salvage it. Other warning signs include a truly putrid, rotten-egg, or sewage-like smell (distinct from a positive, funky aroma), or a mushy texture in your vegetables, which can indicate harmful bacterial activity. Trust your senses—if it looks or smells truly off, it’s best to start fresh. Better safe than sorry!
The Sweet Spot: Mastering Fermentation Temperature
Temperature plays a significant role in the speed and safety of your ferments. For most vegetable ferments, maintaining optimal fermentation temperatures between 65-75°F (18-24°C) is best – this is the sweet spot where beneficial bacteria thrive.
- Too Warm: Temperatures above 80°F (27°C) can accelerate fermentation too quickly, potentially encouraging less desirable bacteria and resulting in mushy vegetables. They’ll finish too fast and lose their delightful crunch.
- Too Cool: Below 60°F (15°C), fermentation will slow down considerably, or may not even start. Your microbes will be sluggish! Finding a stable spot in your home, away from direct sunlight or drafts, is part of simple fermentation recipes for beginners that yield the best, most consistent results.
By following these fundamental fermentation tips for beginners, you’re not just making food—you’re cultivating a rich ecosystem of beneficial microbes. Embrace the process, trust these guidelines, and get ready to enjoy the incredible flavors and health benefits of your very own fermented creations!
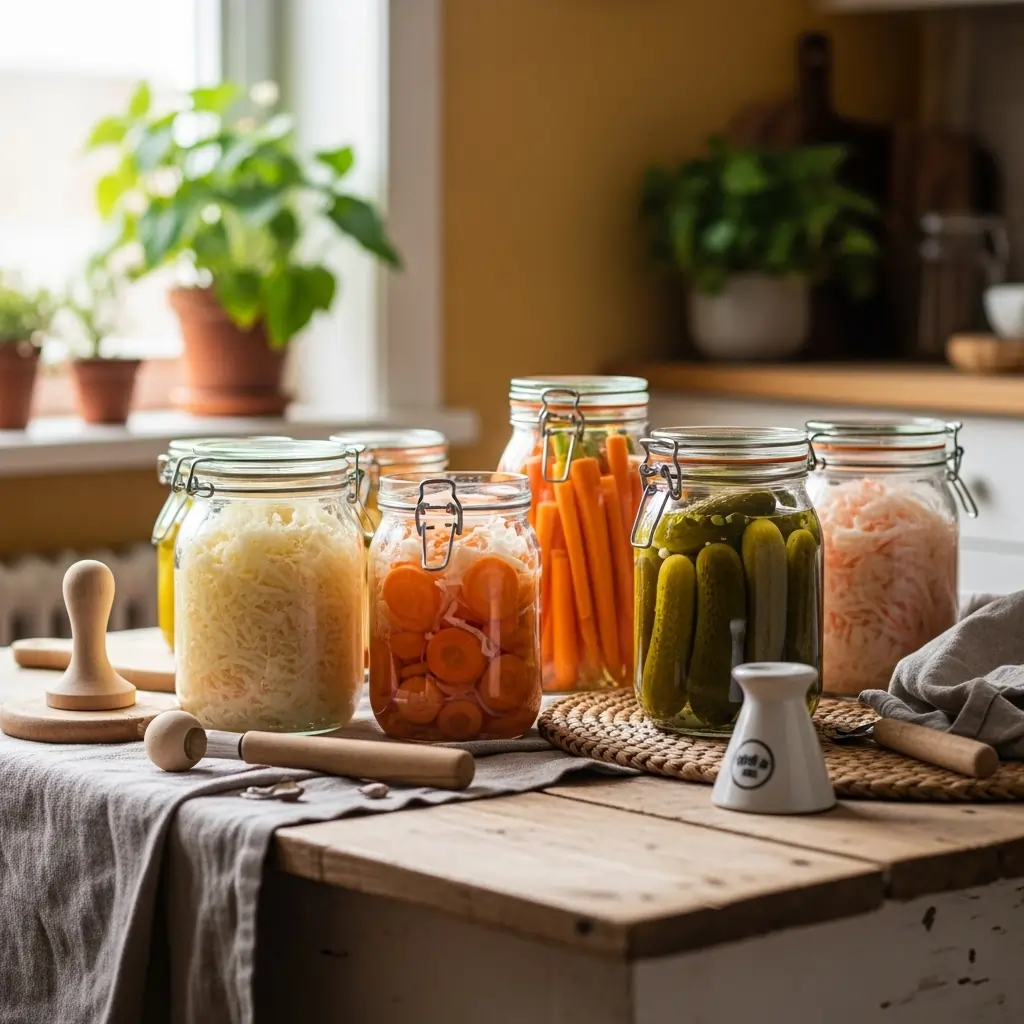
Your First Ferment: Crafting Crisp, Tangy Carrots
Embarking on your fermentation journey doesn’t have to be daunting. In fact, it’s one of the most rewarding culinary adventures you can take! For anyone wondering how to start fermenting vegetables at home, fermented carrots are the perfect entry point. They are an incredibly easy ferment that delivers a satisfyingly crisp, tangy crunch, brimming with homemade probiotics. This guide provides clear, step-by-step fermentation tips for beginners, ensuring your first time fermenting is a resounding success built on solid fermentation safety principles.
Recipe Card: Your First Fermented Carrots
| Category | Details |
|---|---|
| Prep time | 15 minutes |
| Fermentation time | 5-14 days (at 65-75°F / 18-24°C) |
| Yield | 1 quart (approximately 1 liter) |
| Ingredients | 1.5 lbs (700g) carrots, 1.5-2 tbsp (25-30g) non-iodized salt, 2 cups (500ml) filtered water, optional flavorings |
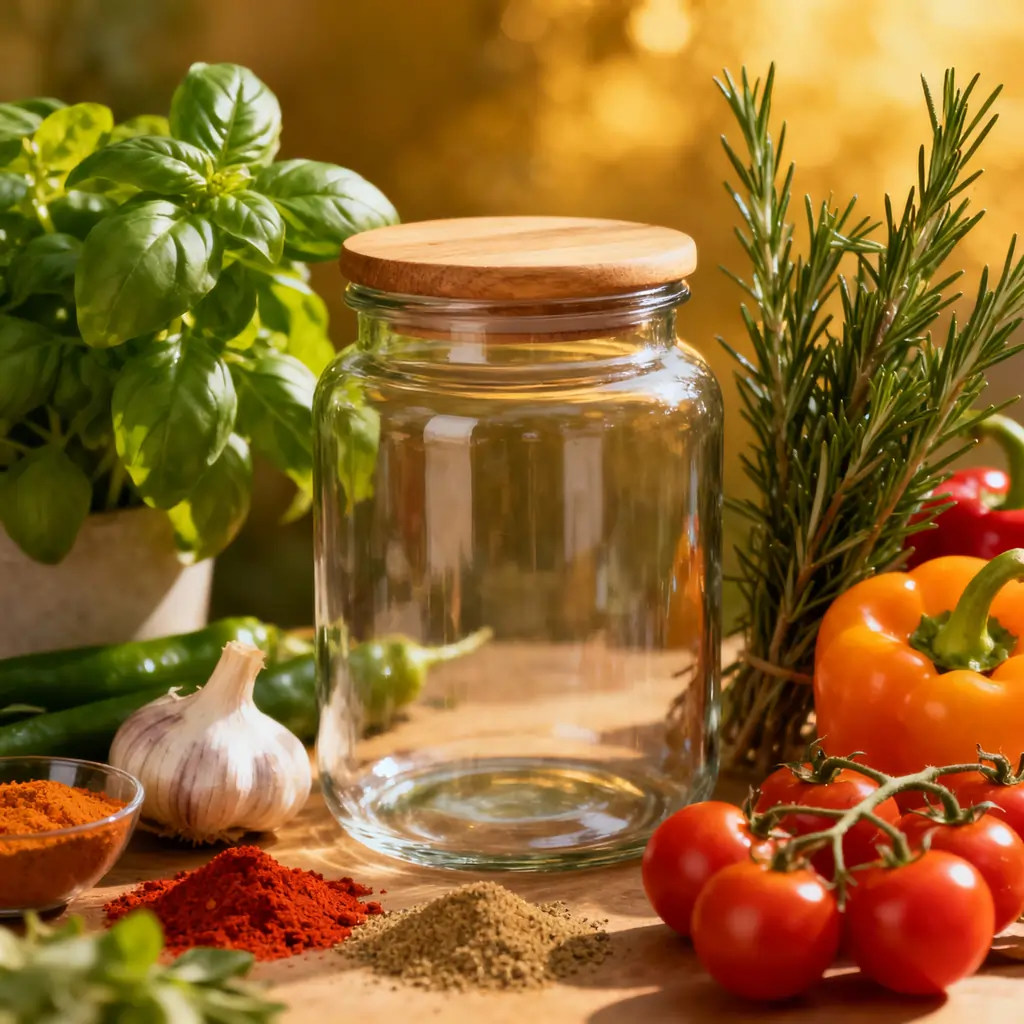
Your Fermentation Toolkit: What You’ll Need
Before you dive in, let’s make sure you have everything required for this foundational beginner fermentation project. This answers the common question: what do I need to start fermenting?
Ingredients:
- 1.5 lbs (700g) fresh carrots: Choose firm, crisp carrots with vibrant color. Organic is often preferred for a richer natural bacterial community on their surface, which kickstarts fermentation with extra vigor.
- 1.5-2 tablespoons (25-30g) non-iodized sea salt or kosher salt: This is crucial. Non-iodized salt is essential because iodine and anti-caking agents found in regular table salt can inhibit or even kill the beneficial bacteria we want to cultivate. Use a kitchen scale for precision; a 2-3% salt concentration is optimal for safety and flavor – it’s the brine’s secret weapon.
- 2 cups (500ml) filtered or dechlorinated water: Chlorine in tap water is a microbial party pooper! If you don’t have filtered water, simply let tap water sit uncovered for 24 hours to allow the chlorine to dissipate.
Optional Flavor Enhancers:
- 2-3 smashed garlic cloves: Adds a wonderful savory depth and pungent aroma.
- 1 tablespoon fresh dill: A classic pairing that imparts a bright, herbaceous note and a lovely green fleck.
- 1 teaspoon black peppercorns: For a subtle, aromatic warmth and a hint of spice.
Essential Equipment:
- 1 quart (approximately 1 liter) wide-mouth glass jar: Sterilized and sparkling clean. Glass is non-reactive and allows you to observe the magic unfolding – watch for those tiny bubbles!
- Kitchen scale: For precise salt measurements, enhancing fermentation safety and ensuring consistent results.
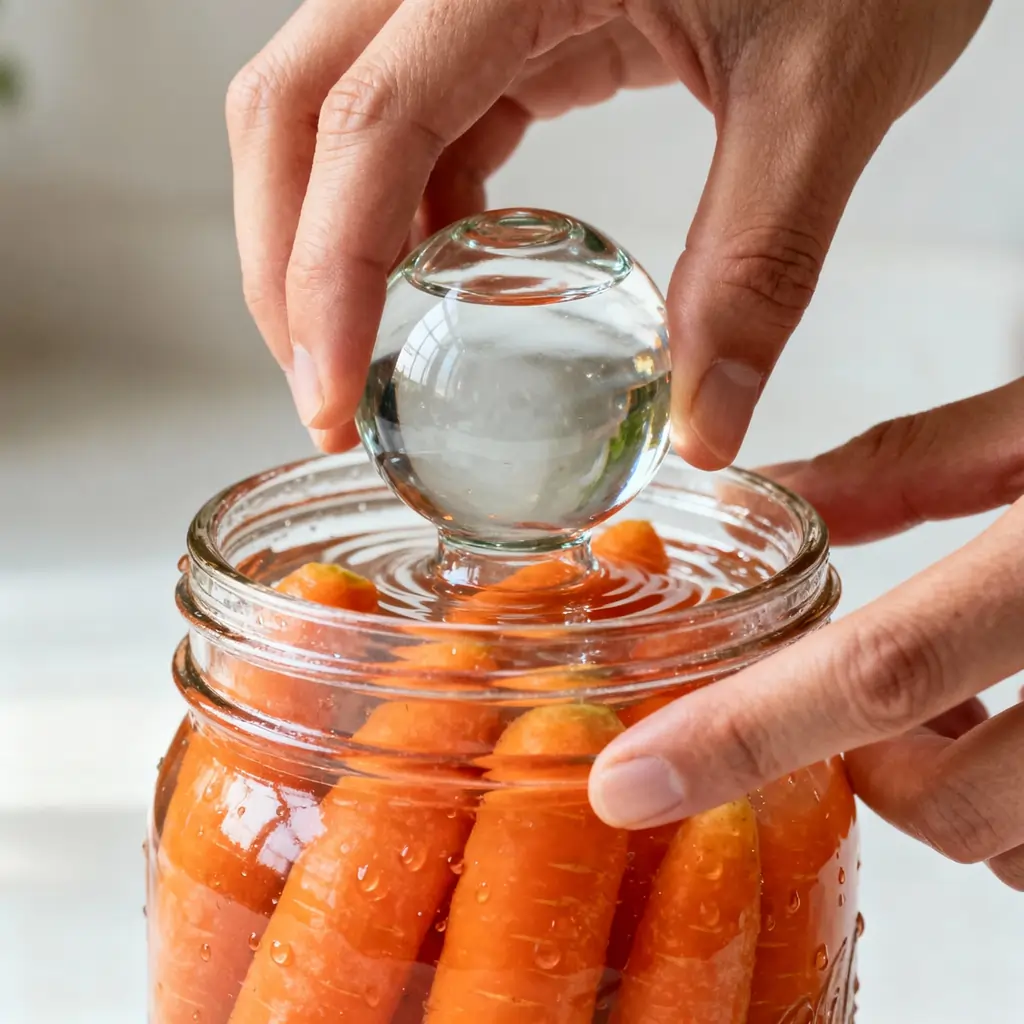
- Fermentation weight: A glass or ceramic weight, or even a small ceramic dish, is vital for keeping vegetables submerged beneath the brine’s protective surface.
- Airlock system or standard loose lid: An airlock allows carbon dioxide to escape without letting oxygen in, creating a perfect anaerobic haven. A loose lid serves the same purpose if not sealed tightly, letting the ferment breathe.
- Sharp knife and cutting board: For preparing your carrots with ease and precision.
From Root to Jar: Your Step-by-Step Fermentation Adventure
Follow these simple fermentation recipes for beginners to create your own delicious, probiotic-rich carrots.
- Prepare Your Carrots: Wash your carrots thoroughly under cool water. You can peel them if you prefer, but the skin often harbors beneficial bacteria and adds a satisfying texture. Cut the carrots into uniform coins, sticks, or matchsticks. Uniformity ensures even fermentation and consistent texture throughout the batch, leading to a more reliable and enjoyable result – imagine every bite having that perfect crisp snap!
- Craft Your Brine: In a separate bowl, combine your non-iodized sea salt with the room-temperature filtered or dechlorinated water. Stir vigorously until the salt is completely dissolved and no crystals remain at the bottom. This creates your precisely balanced 2-3% salt brine, which is absolutely crucial for creating an environment where beneficial bacteria thrive while inhibiting undesirable spoilage organisms. This precise brine is a core fermentation tip for beginners for both flavor and fermentation safety – it’s the lifeblood of your ferment.
- Pack Your Jar with Purpose: Begin tightly packing the prepared carrot pieces into your clean, sterilized 1-quart wide-mouth glass jar. As you go, layer in any optional flavorings like smashed garlic, fresh dill, or black peppercorns, distributing their aromatic goodness. Pack them down firmly, leaving about 1.5-2 inches of headspace from the top of the jar – this gives the bubbling action room to play.
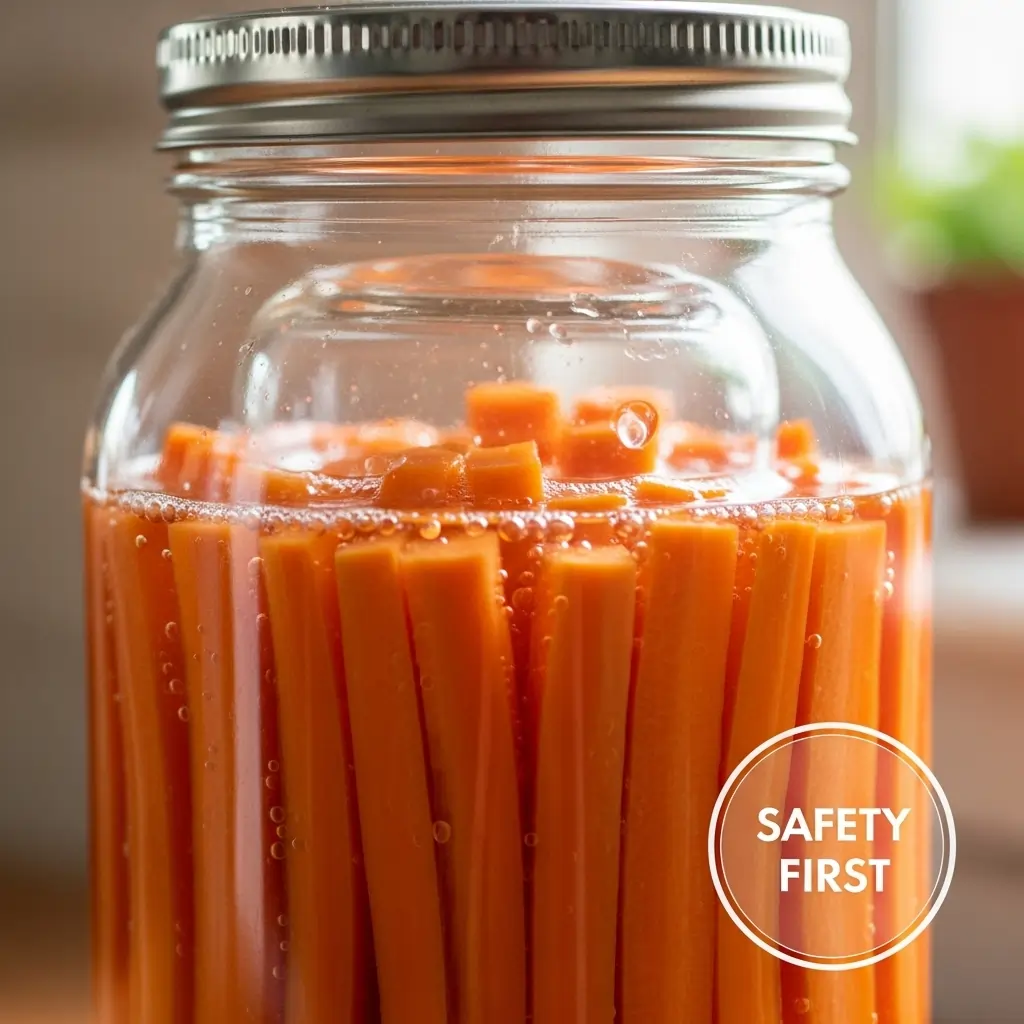
- Critical Submersion: The Golden Rule of Fermentation: Slowly pour the prepared brine over the packed carrots. It is absolutely critical that all vegetables are completely submerged under the brine. Pour enough so there’s at least 1 inch of brine covering the top of the carrots. Now, place your fermentation weight or small ceramic dish directly on top of the carrots, pressing down firmly to keep them securely below the liquid surface. This step is a cornerstone of safe fermentation practices for new learners, as it prevents exposure to oxygen, which can lead to mold growth and spoilage. You’ll see the liquid rise, embracing your carrots in their salty, protective bath.
- Set the Stage for Fermentation: Cover your jar. If you’re using an airlock system, attach it according to its instructions. If not, simply place a standard lid on top, but don’t screw it on tightly—leave it loose enough for gases to escape. Position the jar in a stable spot, ideally between 65-72°F (18-22°C), away from direct sunlight. This temperature range encourages active, healthy fermentation. You might notice the brine becoming slightly cloudy and the carrots changing color slightly – these are normal, healthy signs of activity!
- Monitor, Observe, and Taste (Sensory Timeline):
- Day 1-2: The Quiet Anticipation. Things will be relatively still, but beneath the surface, the microbial party is just beginning to warm up. The brine may remain clear.
- Day 3-5: The Bubbling Awakening. You’ll start to see tiny, steady bubbles begin to rise as fermentation kicks off! The brine will become noticeably cloudy, a beautiful milky swirl indicating thriving beneficial bacteria. You might even hear a faint fizzing sound if you listen closely. The aroma will begin to shift from fresh vegetable to a pleasantly tangy, slightly sour scent.
- Day 5+: The Flavor Evolution. The bubbling will continue, and the brine will become even cloudier. The aroma will turn distinctly pleasantly sour and complex, like a good pickle. This is when you start taste-testing! Using a clean fork, pull out a small piece of carrot daily. It should taste pleasantly tangy, sour, and complex, not just salty. When it reaches your desired level of tanginess and crispness (this usually takes 5-14 days, depending on temperature and your preference), it’s ready! Trust your palate—it’s your best guide for these simple fermentation recipes for beginners.
- Refrigerate for Longevity: Once your fermented carrots have achieved their perfect flavor and texture, remove the fermentation weight. Tighten the lid on the jar and transfer it to the refrigerator. The cool temperature will significantly slow down the fermentation process, preserving their delightful flavor and satisfying texture for several months. Enjoy your delicious, homemade probiotics – a crunchy, tangy triumph!
Pro-Tips: Nailing Your First Batch (and Beyond!)
- Fermentation Time Varies with Temperature: Remember, warmer temperatures (within the ideal range) will speed up fermentation, while cooler temperatures will slow it down. Adjust your monitoring and tasting schedule accordingly. It’s like a slow dance for your microbes!
- Don’t Fear the Film: If you see a thin, white, powdery film on the surface (not fuzzy mold), it’s likely kahm yeast, which is harmless. Simply skim it off carefully. For more detail, check our guide on troubleshooting beginner fermentation problems.
- Embrace Experimentation: Once you master this basic recipe, feel free to experiment with other spices, herbs, or even other vegetables. Fermentation is an art as much as a science – let your culinary creativity shine!
- Listen to Your Senses: Always trust your nose and eyes. If anything smells truly putrid (like rotten eggs), looks fuzzy (mold), or has an alarming pink discoloration, it’s best to discard the batch and start fresh. Your fermentation safety is paramount.

The Unsung Heroes: Salt and Water in Fermentation
When you’re diving into the exciting world of homemade probiotics through fermentation, it might seem like the vibrant vegetables get all the glory. But behind every crisp, tangy bite lies the unsung heroes: salt and water. Understanding their critical roles is one of the most important fermentation tips for beginners and forms the bedrock of safe fermentation practices for new learners.
Salt: The Brine’s Bouncer and Flavor Enhancer
Salt isn’t merely a seasoning in fermentation; it’s a powerful and non-negotiable ally. Its role is multifaceted, impacting not only the taste but also the fermentation safety and the delightful texture of your finished product.
- Drawing Out Moisture (Osmosis): When salt is applied to vegetables, it initiates a process called osmosis, gently drawing water out of the cells. This creates a natural brine, a salty liquid environment essential for lacto-fermentation.
- Inhibiting Spoilage: The correct salt concentration (typically 2-3% by weight for most easy ferments) creates an environment that’s hostile to many undesirable bacteria and molds, giving the beneficial Lactobacillus bacteria a competitive edge. Think of it as the brine’s bouncer, keeping the bad guys out. This is paramount for first time fermenting success.
- Maintaining Texture: Salt helps preserve the cell walls of vegetables, contributing to that satisfying crunch we all love in properly fermented foods. Without enough salt, vegetables can become mushy, losing their delightful snap.
The Iodine Interruption: Why Pure Salt Matters
This is a common pitfall for those just starting out, and a key point to remember for beginner fermentation. Regular table salt often contains iodine and anti-caking agents. While harmless in your shaker, these additives can actively interfere with the delicate ecosystem of beneficial bacteria you’re trying to cultivate. Iodine can be antimicrobial, directly hindering the growth of the very microbes responsible for fermentation, potentially leading to fermentation failure or off-flavors. If you’re troubleshooting beginner fermentation problems and your ferments aren’t bubbling, check your salt – it might be the iodine interruption!
Your Salt Selection: Best Bets for Brine
So, what do I need to start fermenting when it comes to salt? Stick to pure, additive-free options.
- Sea Salt: Our top recommendation. Rich in natural minerals, it dissolves beautifully and imparts a clean, nuanced flavor to your ferments.
- Kosher Salt: Another excellent choice. It’s pure, free of additives, and its larger flake size can make it easier to measure accurately by weight.
- Himalayan Pink Salt: A mineral-rich option that adds a beautiful aesthetic and a slightly more complex flavor profile.
Water Wisdom: Dechlorinate for Delightful Ferments
Just like iodine in salt, chlorine in tap water is a silent saboteur of easy ferments. Chlorine is a disinfectant, designed to kill bacteria in municipal water supplies – unfortunately, it doesn’t discriminate between harmful pathogens and the wonderful beneficial bacteria you want in your jar.
To ensure success when you’re learning how to start fermenting vegetables at home with simple fermentation recipes for beginners:
- Filtered Water: The simplest solution. A good quality water filter will remove chlorine and other impurities, leaving you with clean, pure water for your brine.
- Dechlorinated Tap Water: If you don’t have a filter, simply pour your tap water into an open container and let it sit uncovered for at least 24 hours. The chlorine will naturally off-gas into the air, making the water safe for your fermentation project. It’s a simple act of water wisdom for delightful ferments!
By paying close attention to these two fundamental ingredients, you’ll be well on your way to creating delicious, crisp, and safely fermented vegetables, ensuring a rewarding experience every time.
Beyond Basic Brine: Unleashing Your Inner Fermentation Artist
Once you’ve mastered the basics of your first successful batch of fermented carrots, a whole world of flavor awaits! One of the most exciting aspects of beginner fermentation is discovering how easily you can customize your ferments. These fermentation tips for beginners will empower you to transform simple vegetables into complex, and incredibly delicious homemade probiotics. Don’t be afraid to experiment – that’s where the real magic (and learning!) happens, allowing you to unleash your inner fermentation artist.
Herbaceous Hugs: Infusing Aromatic Magic
Adding fresh herbs is an easy ferments technique that instantly elevates the complexity and aroma of your vegetables. Imagine the bright, fresh notes of dill mingling with the tangy crunch of carrots, or the earthy warmth of rosemary and thyme infusing your batch. For a deeper, more savory profile, a single bay leaf can work wonders. Simply tuck your chosen herbs amongst your packed vegetables before pouring in the brine. As fermentation progresses, their essential oils will subtly permeate the brine, creating an aromatic delight that will greet your nose with a pleasant, herbaceous tang when you open the jar. This is a fantastic step for anyone wondering how to start fermenting vegetables at home with a personal twist, adding herbaceous hugs to your ferment.
Spice It Up: A Kick of Flavor for Your Cultures
Ready to add a little kick or a pungent depth to your ferments? Spices are your secret weapon! Incorporating a few smashed garlic cloves or thin slices of fresh ginger can introduce a wonderful, warming undertone to your carrots. For those who enjoy a gentle heat, a pinch of red pepper flakes will add a subtle warmth that develops beautifully during fermentation, leaving a pleasant tingle. And don’t forget black peppercorns; their mild spice and visual appeal make them a classic addition. These additions are part of many simple fermentation recipes for beginners and are also believed to offer additional beneficial compounds. The aroma might start out bold, but it mellows and integrates into a complex, satisfying flavor as the microbes work their magic.
Veggie Medleys: A Symphony of Textures and Tastes
Who says fermentation has to be a solo act? While single-vegetable ferments are excellent for first time fermenting, mixing and matching your produce opens up a new realm of possibilities. Instead of just carrots, try adding crisp radishes for a peppery bite and a satisfying pop, or firm green beans for a different textural experience. Florets of cauliflower absorb brine beautifully and offer a delightful tenderness. Or, why not create a “medley” with a combination of your favorites? Imagine a symphony of textures and tastes! When mixing, just remember our crucial fermentation safety rule: ensure all vegetables are uniformly cut and fully submerged under the brine. This variety is also great for enhancing the diversity of your homemade probiotics.
Seasonal Sensations: Fermenting with Nature’s Calendar
One of the best fermentation tips for beginners is to let the seasons guide your choices. Using what’s fresh and abundant in your local market not only ensures the best flavor and nutritional value but also means your vegetables will have a higher count of naturally occurring beneficial bacteria, leading to more robust and successful ferments. In spring, think bright radishes and tender asparagus. Summer brings crisp cucumbers, vibrant bell peppers, and snappy green beans. Fall is perfect for hearty root vegetables like carrots, earthy beets, and crunchy cabbage. By choosing peak-season produce, you’re setting yourself up for success and minimizing potential troubleshooting beginner fermentation problems that can arise from tired, out-of-season ingredients. It’s a fundamental aspect of safe fermentation practices for new learners and ensures an active fermentation from the start, bringing seasonal sensations to your table.
From Jar to Plate: Enjoying & Storing Your Fermented Treasures
Congratulations! You’ve successfully brought a batch of tangy fermented carrots to life. Now, let’s talk about how to enjoy your delicious homemade probiotics and keep them fresh. These easy ferments are a fantastic way to introduce yourself to the world of homemade probiotics and are a prime example of simple fermentation recipes for beginners. It’s time to move your fermented treasures from jar to plate!
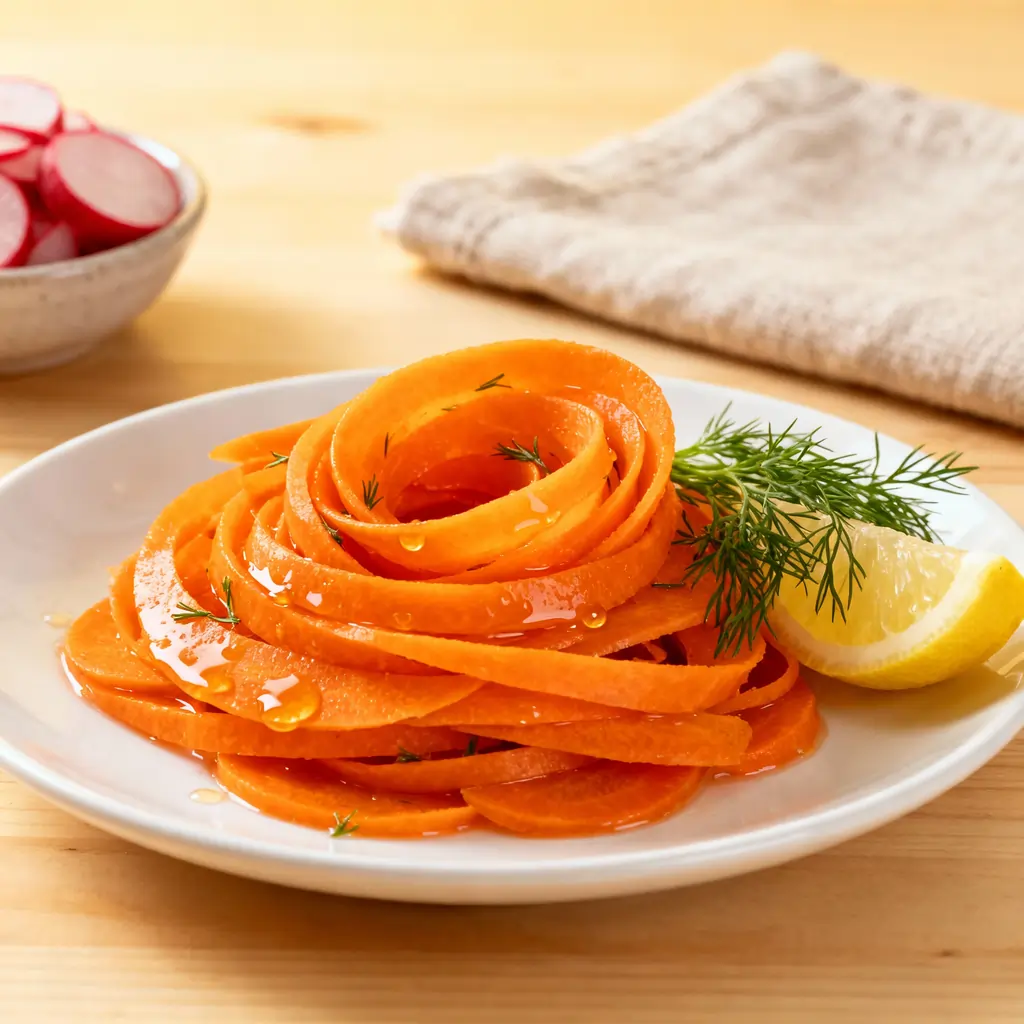
Savor the Tang: Creative Ways to Enjoy Your Carrots
Once your fermented carrots have reached their desired level of tanginess, the culinary possibilities are endless! Their crisp, tangy crunch and bright flavor make them a versatile addition to almost any meal.
- As a side dish: Serve them alongside grilled meats, roasted vegetables, or anything that benefits from a bright, acidic counterpoint. Their vibrant color makes them a beautiful plate addition.
- In salads: Chop them up and toss them into your favorite green salads for an extra layer of flavor and texture – a delightful pop in every bite.
- On sandwiches & wraps: Add a few slices to elevate your lunch with a satisfying crunch and a burst of savory-sour goodness.
- As a tangy snack: Simply grab a few pieces straight from the jar for a refreshing, gut-friendly bite. This is a fantastic way to incorporate more beneficial microbes into your daily routine when you’re just learning how to start fermenting vegetables at home. Savor that tangy goodness!
Chill Out: Refrigeration for Lasting Freshness
Once your fermented carrots taste just right – a pleasant sourness that makes your lips pucker in the best way – it’s time to slow down the bacterial party.
- Transfer to the fridge: Simply tighten the lid on your jar and move it to the refrigerator. This is a crucial fermentation tip for beginners to master for successful long-term storage.
- Why it works: Cold temperatures significantly slow down the beneficial bacterial activity, effectively pausing the fermentation process. This means your carrots will maintain their delicious flavor and crisp texture for much longer. It’s like putting your ferment into a delightful, cool slumber.
Time Travel: Shelf Life & Flavor’s Journey
Properly stored in the refrigerator, your fermented carrots can last for several months. In fact, many people find that the flavors continue to develop and deepen over time, becoming even more complex and nuanced – a true flavor evolution! Don’t be surprised if your batch tastes even better a month or two down the line! This extended shelf life makes first time fermenting highly rewarding, as you get to enjoy your efforts for weeks on end, experiencing a little time travel for your taste buds.
Trust Your Senses: Good Signs vs. Red Flags
Fermentation safety is paramount, especially when you’re navigating beginner fermentation. While fermented foods are generally very safe, it’s essential to know the difference between normal fermentation signs and actual spoilage. Always trust your senses – they are your best guide!
✅ Normal & Healthy Signs:
- Cloudy brine: This is a beautiful, milky sign of active bacterial fermentation – a healthy haze.
- Steady bubbling: Indicates CO2 production as microbes thrive, like tiny champagne bubbles rising.
- White film (Kahm yeast): This thin, white, often wrinkly film on the surface is harmless. It’s a type of wild yeast that can form when exposed to air. Simply skim it off the top and continue enjoying your ferment. It’s one of the common troubleshooting beginner fermentation problems that isn’t actually a problem!
- Slight color changes: Carrots may lighten or darken a little, a natural part of their transformation.
- Pleasantly tangy aroma: A clean, sour, or earthy smell, like good pickles or sauerkraut.
🚨 Immediate Red Flags (Discard the Entire Batch!):
- Fuzzy mold: This is the most important distinction. If you see any fuzzy growth, regardless of color (black, green, pink, or even fuzzy white, unlike the flat Kahm yeast), DISCARD THE ENTIRE BATCH. Mold indicates contamination by undesirable microorganisms.
- Putrid odors: While fermented foods often have a “funky” or pungent aroma (think strong cheese or sour pickle), a truly putrid smell—like rotten eggs, sewage, or something distinctly “off” and unpleasant—is a clear sign of spoilage.
- Excessively mushy texture: Your fermented carrots should retain some crispness and snap. If they are excessively soft or mushy, it suggests that harmful bacteria may have taken over.
By following these safe fermentation practices for new learners, you’ll confidently enjoy your homemade fermented carrots and continue your journey with homemade probiotics!
Fermentation Fixes: Your Troubleshooting Toolkit
Embarking on your first fermentation journey is an exciting step towards creating delicious, homemade probiotics and embracing a vibrant, living food tradition. While beginner fermentation is often straightforward, it’s completely normal for new fermenters to encounter a few bumps along the way. Think of these as invaluable fermentation tips for beginners – each challenge is a chance to deepen your understanding and build confidence. Our goal at Fermention.com is to provide clear, scientific guidance, ensuring your first time fermenting is safe and ultimately successful. Let’s demystify some common troubleshooting beginner fermentation problems you might encounter when learning how to start fermenting vegetables at home. Consider this your personal fermentation fixes toolkit!
The Great White Debate: Kahm Yeast vs. Mold
This is perhaps the most common concern for anyone making easy ferments. A white film appears on the surface, and panic can set in. Let’s clarify:
- Kahm Yeast (Harmless): This appears as a thin, white, sometimes wrinkly or lacy film on the surface of your brine, often resembling a pellicle. It’s a common byproduct of fermentation, particularly when there’s still a little oxygen present, and it’s completely harmless. It doesn’t typically have a fuzzy texture, nor does it spread down into the vegetables. It often smells yeasty or like fresh bread.
- What to do: Simply skim it off the surface with a clean spoon. Your ferment is still perfectly safe to enjoy, though it might impart a slightly yeasty flavor. To prevent its recurrence, ensure your vegetables are always fully submerged under the brine, using a proper fermentation weight.
- Mold (Discard Immediately): This is the true red flag. Mold will appear fuzzy, often in distinct patches, and can be various colors – green, black, pink, or even fuzzy white. If you see any fuzzy growth, especially if it’s vibrant in color, it’s a clear sign that unwanted microorganisms have taken hold.
- What to do: DISCARD THE ENTIRE BATCH. Do not try to skim mold off. The roots of mold often extend deep into the food, and consuming it can be harmful. This is a critical aspect of fermentation safety and safe fermentation practices for new learners. Learn from it, clean your equipment thoroughly, and start fresh.
The Quiet Jar: Where Are My Bubbles?
You’ve packed your jar, poured your brine, and days later… nothing seems to be happening. Don’t despair! This is a frequent query for first time fermenting enthusiasts. Your jar might just be a “quiet jar,” but still working.
- Possible Root Causes & Solutions:
- Too Cold Environment: Fermentation is a temperature-dependent process. Optimal activity for most vegetables occurs between 65-75°F (18-24°C). If your kitchen is cooler, the beneficial bacteria will work much slower, or even go dormant.
- Solution: Relocate your jar to a warmer spot in your home (away from direct sunlight, which can overheat the ferment). Patience is key; it might just need more time to wake up.
- Chlorinated Water: Chlorine, used to sanitize tap water, can inhibit or even kill the beneficial bacteria crucial for fermentation.
- Solution: Always use filtered or dechlorinated water. You can dechlorinate tap water by letting it sit uncovered for 24 hours, allowing the chlorine to evaporate.
- Insufficient Natural Bacteria: While vegetables naturally carry Lactobacillus bacteria, sometimes there aren’t enough to kickstart a robust fermentation, especially if vegetables were heavily washed or non-organic.
- Solution: For future batches, consider using organic vegetables, which typically have more surface bacteria. For a current sluggish batch, you can try adding a small piece of an actively fermenting vegetable (like a sliver of sauerkraut) or a teaspoon of brine from a successful ferment (ensure it’s from a reputable source).
- Excessive Salt: While salt is vital, too much can slow down or completely halt bacterial activity.
- Solution: Ensure you’re using a precise 2-3% salt concentration by weight. A kitchen scale is your best friend here.
- Too Cold Environment: Fermentation is a temperature-dependent process. Optimal activity for most vegetables occurs between 65-75°F (18-24°C). If your kitchen is cooler, the beneficial bacteria will work much slower, or even go dormant.
The Mushy Mystery: Why Are My Veggies Soft?
You’re aiming for a crisp, tangy crunch, but instead, you pull out a soft, unappetizing vegetable. Mushiness is a common texture issue, especially with simple fermentation recipes for beginners. It’s the mushy mystery that can baffle new fermenters.
- Possible Root Causes & Solutions:
- Over-Fermentation: Leaving vegetables to ferment for too long, especially in warmer temperatures, can lead to their cellular structure breaking down excessively.
- Solution: Start tasting your ferments daily after about day 5. When they reach your desired level of tanginess and retain a pleasant texture, move them to the refrigerator to slow down the fermentation process.
- Too High Temperature: Fermenting above 80°F (27°C) can accelerate fermentation too much, encouraging the wrong types of bacteria and leading to rapid softening.
- Solution: Monitor your fermentation temperature. Aim for that sweet spot of 65-75°F (18-24°C).
- Insufficient Salt: Salt plays a crucial role in maintaining the crispness of vegetables by strengthening their cell walls and drawing out moisture. If there’s not enough salt, vegetables can become soft more easily.
- Solution: Double-check your salt concentration. For easy ferments like carrots or cabbage, a 2-3% brine (by weight of total ingredients) is ideal. Always use non-iodized salt (sea salt or kosher salt) as iodine can interfere.
- Poor-Quality or Old Vegetables: Starting with vegetables that are already soft, bruised, or past their prime will result in mushy ferments.
- Solution: Always select firm, fresh vegetables. Organic is often preferred for better surface bacteria.
- Over-Fermentation: Leaving vegetables to ferment for too long, especially in warmer temperatures, can lead to their cellular structure breaking down excessively.
- Current Batch: While mushy fermented vegetables might not be ideal for eating raw, they are often still safe to consume unless accompanied by mold or putrid odors. You can repurpose them in cooked dishes, like stews or soups, where their texture won’t be as noticeable.
Flavor Fails: Too Salty, Not Sour Enough?
Taste is subjective, but sometimes your ferment might be off the mark. These are common fermentation tips for beginners to help you adjust your flavor profile.
- Too Salty:
- Root Cause: Too much salt was added initially.
- Solution: If your ferment tastes overly salty, you can rinse the vegetables thoroughly under cold water before serving to remove some of the surface salt. For future batches, ensure accurate salt measurements using a kitchen scale. Remember, a slightly higher salt content (closer to 3%) can extend shelf life and maintain crispness, but balance is key.
- Patience Factor: Sometimes, a slightly salty ferment will mellow in flavor as it ages in the refrigerator, and the beneficial bacteria continue to work their magic, creating more complex, less overtly salty notes.
- Not Sour Enough:
- Root Cause: The fermentation process hasn’t gone on long enough, or the conditions were too cool for the bacteria to produce sufficient lactic acid.
- Solution: Simply extend the fermentation period. If your ferment is in a cool spot, move it to a warmer area (within the optimal 65-75°F range) to encourage the beneficial microbes to work more actively. Taste daily after day 5. You’re looking for that characteristic “tangy, bright” flavor that indicates a successful lacto-ferment.
- Sensory Cue: When you achieve that satisfying “lip-smacking, pleasantly sour” taste, that’s your cue to move it to the fridge.
Fermentation is an art and a science, and every batch offers a learning opportunity. Don’t be discouraged by minor setbacks; they are part of the journey to becoming a confident fermenter. With these fermentation tips for beginners and a little practice, you’ll be enjoying delicious, homemade probiotics in no time!
[Image Placeholder]
“A split image comparing two fermentation jars: one showing harmless, thin white Kahm yeast on the surface, and the other clearly displaying fuzzy green mold with a red ‘X’ to indicate spoilage.” View Generation Prompt
‘A split image showing two jars of fermenting vegetables: one with harmless kahm yeast (a thin, white, flat film on the surface) and another with clear, fuzzy green mold (with a red ”X” over it), for easy visual comparison.’
Watch the Magic: Fermenting Carrots Step-by-Step Video
Your Fermentation FAQs: Demystifying Common Questions
Embarking on your journey with homemade probiotics is exciting, and it’s natural to have questions, especially when you’re exploring how to start fermenting vegetables at home for the first time fermenting. Here are some common queries and our expert fermentation tips for beginners to help you confidently create delicious, healthful ferments. We’re here to demystify your common questions!
Is it safe to ferment at home?
Absolutely, yes! When you follow proper hygiene and our clear fermentation safety guidelines, home fermentation is not only safe but highly rewarding. The science behind beginner fermentation is quite elegant: beneficial Lactobacillus bacteria, naturally present on your vegetables, convert sugars into lactic acid. This process rapidly drops the pH of your ferment (typically below 4.6), creating an environment hostile to harmful pathogens like Clostridium botulinum. We prioritize safe fermentation practices for new learners, ensuring that with correct salt ratios, proper submersion of vegetables under brine, and clean equipment, your easy ferments will be a success every time.
What if I see white film on top of my ferment?
Don’t worry, this is almost always a harmless surface yeast known as Kahm yeast. It appears as a thin, white, opaque film – it’s not fuzzy like mold, but rather flat or slightly wrinkled. It’s a common sight when troubleshooting beginner fermentation problems and perfectly normal. Simply skim it off the surface with a clean spoon. To prevent it in future batches, always ensure your vegetables are completely submerged under the brine, using a fermentation weight if necessary, as Kahm yeast thrives in the presence of oxygen.
How long does fermentation take?
For most simple fermentation recipes for beginners, such as carrots or cabbage, the fermentation period typically ranges from 5 to 14 days. However, this isn’t a hard-and-fast rule! The exact timing depends on several factors: the ambient temperature in your home (warmer temperatures, ideally 65-75°F / 18-24°C, will speed up fermentation), the type of vegetable, the size of your cuts, and most importantly, your personal taste preference. We encourage you to start tasting your ferment daily after about day 5. When it reaches a crisp texture and a pleasant, tangy flavor that you enjoy, it’s ready to be moved to the refrigerator, where the cool temperatures will slow down the fermentation process significantly.
Can I use regular table salt?
This is one of the most vital fermentation tips for beginners: No, you cannot use regular table salt for fermentation. Standard table salt contains iodine and often anti-caking agents. These additives can inhibit the growth of the beneficial bacteria we rely on for fermentation, leading to a stalled ferment, off-flavors, or even spoilage. When you’re asking “what do I need to start fermenting successfully?”, always opt for non-iodized sea salt, kosher salt, or Himalayan pink salt. These pure salts ensure your beneficial microbes can thrive, leading to crisp, delicious, and safe ferments.
What if my ferment isn’t bubbling?
It’s a common concern for those first time fermenting to not see vigorous bubbling, but don’t fret! A lack of visible bubbling doesn’t necessarily mean your ferment has failed. The activity might be subtle, or a few factors could be at play.
- Temperature: If your environment is too cool (below 60°F / 15°C), the beneficial bacteria will be very sluggish. Try moving your jar to a warmer spot, ideally within the 65-75°F (18-24°C) range.
- Water Quality: If you used chlorinated tap water, the chlorine could be inhibiting the microbes. Always use filtered or dechlorinated water.
- Time: Sometimes, the microbes just need a little more time to get established and start producing CO2. Give it a few more days. This is a classic troubleshooting beginner fermentation problem. Patience is a virtue in fermentation, and often, with a little adjustment or just more time, your homemade probiotics will spring to life!
Can I ferment other vegetables with this recipe?
Absolutely! This recipe provides a fantastic foundation. Many other vegetables can be fermented using a similar 2-3% salt brine, including green beans, radishes, cucumbers (for pickles!), cauliflower, and even mixed vegetable medleys. Just ensure they are cut to a uniform size and remain fully submerged. Experiment with different textures and flavors – that’s half the fun!
Is this a good project to do with kids?
Yes, fermentation can be a wonderful and educational project for kids! It’s a hands-on way to teach them about science, food preservation, and healthy eating. Kids love watching the bubbles appear and tasting the tangy results. Just ensure adult supervision for chopping and emphasize the importance of cleanliness and the “submerged” rule for safety. It’s a delicious way to spark their curiosity!

Your Fermentation Journey: A Delicious Beginning
As we’ve journeyed through the fascinating world of fermentation, it’s clear that this ancient practice is an incredibly accessible and profoundly rewarding endeavor. From creating crisp, tangy ferments to enriching your diet with beneficial microbes, the journey of homemade probiotics adds incredible flavor and tangible health benefits to your life. These easy ferments are not just about food preservation; they’re about transforming simple ingredients into culinary delights, making fermentation an indispensable skill for any health-conscious kitchen.
For those just starting out, remember that beginner fermentation is a learning adventure. Don’t be afraid to experiment, trust your senses, and embrace the process. Every batch is a unique learning experience, and even when facing common troubleshooting beginner fermentation problems like kahm yeast or a slow start, you’re building invaluable intuition. Our comprehensive fermentation tips for beginners are designed to empower you, ensuring that your first time fermenting is met with confidence, not apprehension. We’ve laid out the essentials of what do I need to start fermenting and emphasized safe fermentation practices for new learners so you can proceed without a worry.
Now, celebrate! You’ve taken the first steps on how to start fermenting vegetables at home, creating delicious, probiotic-rich foods that delight the palate. Whether it’s the satisfying pop of a lid releasing effervescent CO2, the vibrant color of perfectly fermented carrots, or the crisp, tangy crunch of your first successful batch, these are the moments that make the effort truly worthwhile. These simple fermentation recipes for beginners are just the beginning of a flavorful, healthy lifestyle.
We encourage you to continue exploring! Share your fermentation successes with us and dive deeper into the rich tapestry of flavors waiting to be discovered. Visit Fermention.com for more recipes, advanced techniques, and a supportive community ready to cheer on your next delicious creation. Don’t forget to share your vibrant ferments on social media using #FermentionFun – let’s inspire each other! Your fermentation journey has just begun, and the possibilities are as diverse and exciting as the microbial world itself. Happy fermenting!

Important Health & Safety Information
Medical Disclaimer: This content is for educational purposes only and is not intended as medical advice. Fermented foods may interact with medications or health conditions. Consult your healthcare provider before making significant dietary changes, especially if you have autoimmune conditions, are pregnant, nursing, or taking medications.
Food Safety Notice: Fermentation carries inherent risks if not performed correctly. Always follow proper sanitation procedures, monitor pH levels when specified, and trust your senses. When in doubt, discard your ferment. The publishers are not responsible for adverse effects from following these instructions.