Quick Answer: Mastering how to make kombucha at home is easier than you think. The journey starts by brewing sweet tea and allowing it to cool. Next, you’ll introduce a SCOBY (Symbiotic Culture of Bacteria and Yeast) and starter tea into a glass jar. Cover it with a breathable cloth and let it ferment for 7-14 days at 68-78°F (20-26°C). When it reaches the perfect tangy flavor, bottle it and add your favorite fruit or juice for a secondary fermentation to create that classic fizz, then chill and enjoy.
Table of Contents
- The Science Simplified: How Kombucha Ferments
- Health Benefits Overview: Why Brew Your Own?
- Complete Recipe/Process Guide: Your First Batch of Kombucha
- Ingredient Spotlight: The Power of Tea & Sugar
- Customization Options: Flavoring Your Homemade Kombucha
- Serving & Storage: Enjoying Your Brew
- Troubleshooting Guide: Common Kombucha Challenges
- Video Guide: Brewing Kombucha Step-by-Step
- Frequently Asked Questions About Kombucha Brewing
- Important Health & Safety Information
The Science Simplified: How Kombucha Ferments
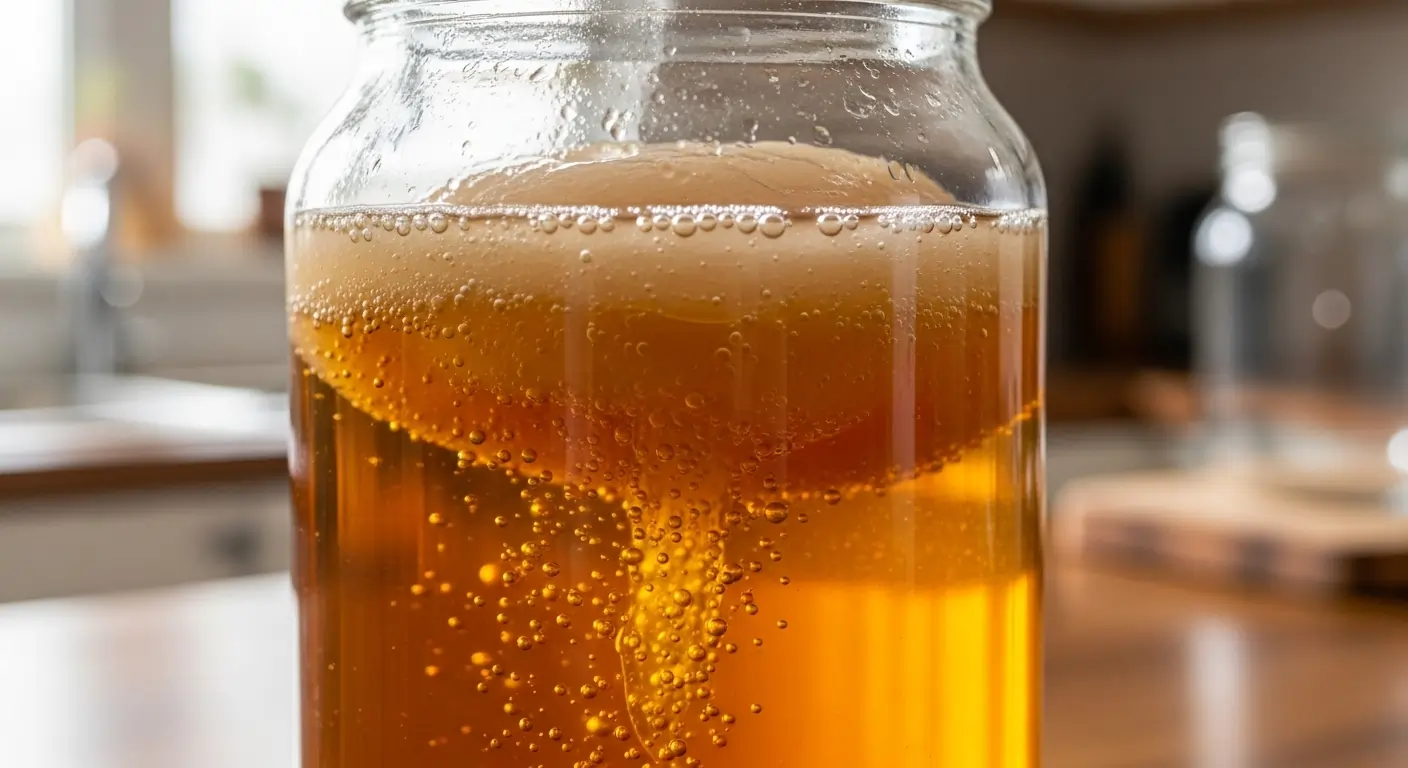
Embarking on your journey to make kombucha at home is an enriching step, and understanding the science behind the fizz will empower you to brew with confidence. At the heart of every successful batch of homemade kombucha is the SCOBY—the Symbiotic Culture of Bacteria and Yeast. This fascinating, gelatinous disc is the living engine that transforms sweetened tea into a complex, tangy fermented tea. Proper SCOBY care is the cornerstone of successful kombucha brewing, ensuring your culture thrives and produces delicious results.
When you begin your kombucha recipe, you introduce your SCOBY to a carefully prepared sweet tea. This is where the microbial process truly begins.
First, the yeast within the SCOBY springs into action. These beneficial microbes consume the sugars present in your tea. Through alcoholic fermentation, they convert these sugars into two primary byproducts: a small amount of alcohol and carbon dioxide (CO2). This initial conversion is vital; gentle bubbling activity within the first few days signals active yeast. This phase sets the stage for the characteristic flavors and effervescence of your brew.
Next, the bacteria in your SCOBY take over. These are primarily acetic acid bacteria, including Lactobacillus species, and they perform a remarkable transformation. They convert the alcohol produced by the yeast into a variety of organic acids, most notably lactic and acetic acids. This is precisely what gives kombucha its characteristic tangy, bright, and complex flavor profile. This bacterial conversion truly defines the unique taste of homemade kombucha, elevating it beyond just sweet tea to a sophisticated, palate-pleasing beverage.
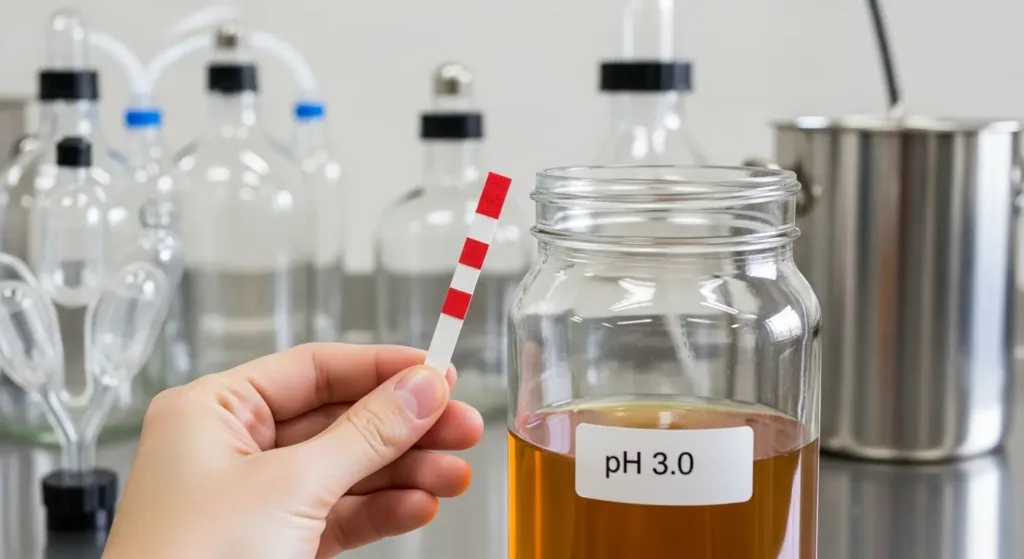
The production of these organic acids is not just about creating that distinctive tangy flavor; it’s also a crucial preservation mechanism. As the pH of the tea drops below 4.6 due to acid production, it creates an environment hostile to most harmful bacteria and molds, ensuring the safety of your fermented tea. This natural preservation is a testament to the ancient art and modern science of fermentation. If you’re diving into a beginner kombucha recipe step by step, understanding this process helps you appreciate the transformation happening in your jar.
For this intricate dance between yeast and bacteria to occur successfully, the right environmental conditions are paramount. The yeast initially thrives in a slightly more aerobic start, benefiting from some oxygen exposure to kickstart its activity. This is why we typically cover our brewing vessel with a breathable cloth, allowing air exchange while keeping contaminants out. However, as fermentation progresses, the acetic acid bacteria prefer a mostly anaerobic environment to efficiently convert alcohol into acids. The CO2 produced by the yeast helps create this low-oxygen environment by forming a protective layer and displacing air.
Factors like ambient temperature (ideally 65-75°F or 18-24°C), the type of tea used (best tea for kombucha brewing is typically black or green tea), and the duration of fermentation all influence how long does kombucha take to ferment. A typical brew might take anywhere from 7 to 14 days, but your palate is your best guide! Learning to taste your brew daily after about day 5 is crucial for perfecting your kombucha brewing and is a key part of troubleshooting kombucha at home if you’re aiming for a specific flavor profile. Knowing what do I need to make kombucha goes beyond ingredients; it includes patience and observation.
Health Benefits Overview: Why Brew Your Own?
Making your own kombucha isn’t just a rewarding culinary adventure; it’s a step towards enhancing your well-being. When you learn how to make kombucha at home, you unlock a range of benefits that store-bought versions often can’t match. This fermented tea is a living elixir, offering a unique blend of traditional wisdom and modern science to support your body.
A Rich Source of Beneficial Bacteria for Gut Health
At the heart of homemade kombucha‘s appeal is its diverse community of beneficial bacteria. During the kombucha brewing process, the SCOBY (Symbiotic Culture of Bacteria and Yeast) transforms sweetened tea into a tangy, effervescent drink brimming with various microbial strains. These living beneficial bacteria contribute to a healthy, balanced gut microbiome, which is crucial for overall wellness. By regularly enjoying your own fermented tea, you’re actively supporting the diversity of your gut flora, a cornerstone of digestive health. Understanding good SCOBY care ensures these beneficial microbes thrive, creating a robust and healthy brew.
Packed with Antioxidants from Tea
The base of any good kombucha recipe starts with tea, typically black or green. Both are renowned for their antioxidant properties. When considering the best tea for kombucha brewing, remember that green tea, in particular, is rich in catechins, powerful antioxidants that help combat oxidative stress in the body. As the tea ferments, these antioxidants remain present, making your homemade kombucha a delicious way to incorporate these protective compounds into your diet.
Supports Digestion and Enhances Nutrient Absorption
A thriving gut microbiome, nourished by the probiotics in your kombucha brewing efforts, plays a significant role in digestive efficiency. The beneficial bacteria assist in breaking down food, which can alleviate common digestive discomforts. Furthermore, fermentation can pre-digest certain nutrients, making them more bioavailable – easier for your body to absorb and utilize. This means the vitamins and minerals in your food, and even in the kombucha itself, become more accessible to your system.
May Indirectly Boost Your Immune System
The connection between gut health and immune function is a rapidly expanding area of scientific understanding. Since a significant portion of our immune system resides in the gut, fostering a diverse and balanced gut microbiome through foods like homemade kombucha can indirectly contribute to a more robust immune response. While kombucha isn’t a magic bullet, supporting your gut with beneficial microbes is a foundational strategy for overall resilience.
Empowering Control Over Sugar Content and Flavorings
Perhaps one of the most compelling reasons to learn how to make kombucha at home is the unparalleled control it gives you. Unlike many commercial brands that can be laden with excessive sugar or artificial flavorings, your kombucha recipe is entirely in your hands. You determine the initial sugar amount, and by monitoring how long does kombucha take to ferment, you can control the final sweetness and tanginess. This allows you to craft a brew perfectly suited to your taste and health goals. From a beginner kombucha recipe step by step to advanced flavoring, you choose natural ingredients, ensuring a pure, wholesome, and delicious fermented tea every time. This control also answers the question of “what do I need to make kombucha” – essentially, just tea, sugar, water, and a healthy SCOBY, allowing you to tailor everything else to your preference.

Complete Recipe/Process Guide: Your First Batch of Kombucha
Embarking on your first homemade kombucha journey is an exciting step into the world of fermented tea! This beginner kombucha recipe step by step will guide you through how to make kombucha at home, transforming simple ingredients into a complex, health-supporting beverage. You’ve got this, and we’re here to ensure your kombucha brewing is a success.
Kombucha Recipe Summary
| Category | Details |
|---|---|
| Prep time | ~20-30 minutes |
| Fermentation time | 7-14 days (F1), 1-3 days (F2, optional) |
| Yield | 1 Gallon |
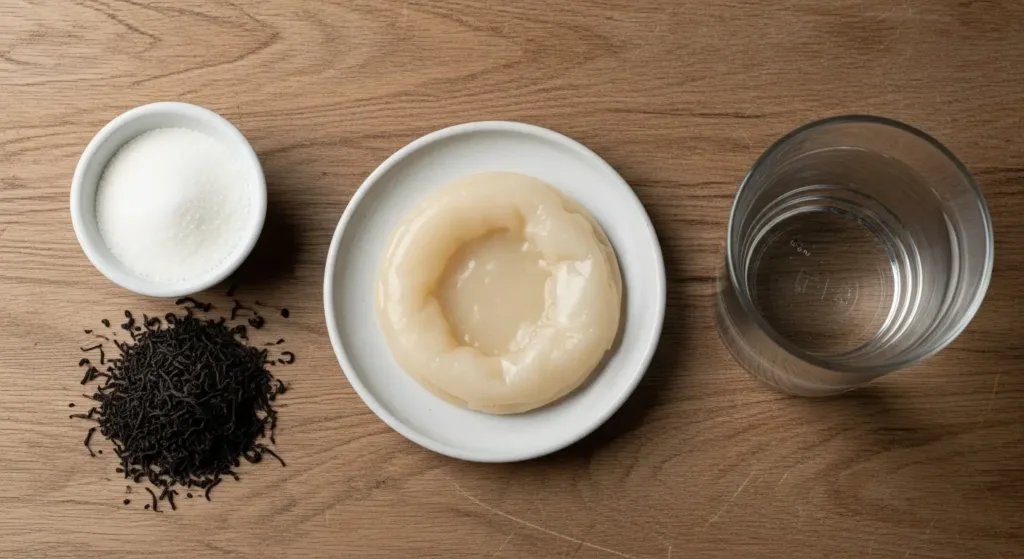
| Ingredients | SCOBY + Starter Tea, Filtered Water, Granulated Sugar, Black or Green Tea |
1. Gather Your Essential Equipment
Before you begin your kombucha recipe, let’s ensure you have everything you need. Having the right tools makes the process smooth and safe:
- 1-Gallon Glass Jar: This is your primary fermentation vessel. Glass is non-reactive and allows you to observe the fascinating changes as your kombucha ferments.
- Breathable Cloth Cover (Cheesecloth or a clean tea towel): Essential for allowing air circulation while keeping unwanted dust and pests out.
- Rubber Band: To securely fasten your cloth cover around the jar.
- Large Pot: For brewing your sweet tea base.
- Stirring Spoon: A non-metal spoon is ideal to avoid any reaction with the acidic tea.
- Bottles for Bottling (Swing-top or repurpose old kombucha bottles): For your optional second fermentation (F2) and storage. Ensure they are clean and can withstand pressure if you’re aiming for carbonation.
Knowing what do I need to make kombucha is the first step to confidence!
2. Ingredients for Your Homemade Kombucha
The beauty of homemade kombucha lies in its simple, yet powerful, ingredients:
- 1 SCOBY (Symbiotic Culture Of Bacteria and Yeast) + 1-2 cups Starter Tea: This is the heart of your kombucha. The SCOBY is the living culture that performs the fermentation, and the starter tea (acidic kombucha from a previous batch or store-bought unflavored kombucha) is crucial for lowering the pH of your brew from the start, protecting your SCOBY and encouraging beneficial microbes. Proper SCOBY care begins with a healthy starter.
- 8 cups Filtered Water: Chlorine in tap water can harm your delicate SCOBY and beneficial bacteria. Always use filtered or dechlorinated water (you can let tap water sit uncovered for 24 hours to allow chlorine to evaporate).
- 1 cup Granulated Sugar: Don’t worry, the SCOBY consumes most of this sugar during fermentation, converting it into beneficial acids and a trace amount of alcohol.
- 4-6 Black or Green Tea Bags (or 4-6 tsp loose leaf tea): The tea provides nutrients for your SCOBY. Black tea is a classic choice, yielding a robust flavor. Green tea offers a lighter, brighter profile. Both are excellent for kombucha brewing. Experiment to find the best tea for kombucha brewing for your palate!
3. Brew the Sweet Tea Base
This step creates the nutrient-rich foundation for your SCOBY:
- Bring 4 cups of filtered water to a boil in your large pot.
- Remove the pot from the heat. Add the 1 cup of granulated sugar and stir thoroughly until it is completely dissolved.
- Add your tea bags or loose leaf tea. Steep for 5-10 minutes for black tea, or 2-5 minutes for green tea. The longer steeping time for black tea extracts more tannins, which contribute to a richer flavor and a healthier SCOBY.
- Remove the tea bags or strain out the loose leaf tea.
4. Cool the Sweet Tea Properly
This is a critical safety step for your kombucha recipe:
- Add the remaining 4 cups of cold filtered water to the pot. This helps to cool the sweet tea quickly.
- It is absolutely essential that your sweet tea cools to room temperature (65-75°F / 18-24°C) before adding the SCOBY and starter tea. Adding a SCOBY to hot tea will kill the delicate beneficial microbes, preventing fermentation and potentially introducing spoilage. Patience is key here!
5. Combine Your Kombucha Ingredients
Now it’s time to bring everything together:
- Pour the cooled sweet tea into your clean 1-gallon glass brewing jar.
- Gently add the SCOBY to the jar. It may float, sink, or even hover—all are normal!
- Pour in the 1-2 cups of starter tea. This acidic liquid is crucial; it immediately lowers the pH of your brew, creating an environment hostile to harmful bacteria and protecting your SCOBY from mold. This is vital for successful kombucha brewing.
6. Cover and Begin Fermentation
Set your brew up for success:
- Cover the mouth of your jar with the breathable cloth cover (cheesecloth or tea towel).
- Secure it tightly with a rubber band. This allows airflow, which is necessary for the SCOBY, while preventing contaminants from entering.
- Place your jar in a warm spot, ideally between 65-75°F (18-24°C), away from direct sunlight. Consistent temperature is best for active fermented tea production.
Pro-Tip: Temperature Matters!
Fermentation time is highly dependent on ambient temperature. In warmer environments (75-80°F), your kombucha will ferment faster, potentially being ready in 5-7 days. In cooler conditions (65-70°F), it will proceed more slowly, possibly taking 10-14 days or longer. Always taste your brew regularly to determine when it’s reached your preferred balance of sweetness and tang.
7. First Fermentation (F1): The Magic Unfolds
This is where the fermented tea truly comes alive:
- Allow your kombucha to ferment for 7-14 days. How long does kombucha take to ferment depends on your specific environment, temperature, and taste preferences.
- Begin tasting your kombucha after 5-7 days using a clean straw (carefully inserted under the SCOBY).
- Your homemade kombucha should taste tangy, slightly sweet, and lightly vinegary. It will become less sweet and more tart the longer it ferments. Bubbling activity is a good sign of thriving beneficial bacteria. Trust your palate—it’s your best guide!
8. Harvest Your First Batch
When your fermented tea has reached your desired level of tanginess:
- Carefully remove the SCOBY from the jar.
- Also, remove at least 1-2 cups of the finished kombucha. This will serve as the essential starter tea for your next batch of homemade kombucha, ensuring continuous SCOBY care and successful future brews.
9. Second Fermentation (F2 – Optional): Flavor & Fizz
This step is where you can truly customize your homemade kombucha and add that satisfying fizz:
- Bottle the remaining kombucha from your F1 batch into your clean, sealable bottles.
- Add your desired flavorings. This could be 1-2 tablespoons of fruit juice, a few pieces of fresh fruit, ginger, or herbs per 16oz bottle.
- Leave 1-2 inches of headspace in each bottle to prevent explosions from carbonation build-up.
- Seal the bottles tightly and let them ferment for 1-3 days at room temperature. Check carbonation by gently opening a bottle over a sink after 1 day.
10. Refrigerate for Enjoyment
The final step for your delicious fermented tea:
- Once your kombucha has carbonated to your liking (for F2), or immediately after F1 if you skipped F2, refrigerate your bottles.
- Refrigeration significantly slows down the fermentation process, preserving the flavor and carbonation you’ve worked hard to achieve.
Congratulations—you’ve successfully learned how to make kombucha at home and created your very own batch of this wonderfully complex and beneficial fermented tea! Enjoy your homemade kombucha, and get ready for your next kombucha brewing adventure!
Ingredient Spotlight: The Power of Tea & Sugar
Embarking on your journey to how to make kombucha at home starts with understanding the fundamental ingredients that fuel this effervescent, fermented tea. Just like any living ecosystem, your homemade kombucha relies on the right nourishment to thrive. Let’s break down the essential components that make your kombucha brewing a success.
The Tea: Fueling Your Ferment
The foundation of any great kombucha is, naturally, tea. But not just any tea will do. For optimal kombucha brewing and a happy SCOBY, we recommend using traditional, unflavored teas.
- Black, Green, or Oolong Teas: These are your champions. They provide the ideal balance of nitrogen and minerals, crucial nutrients that your SCOBY (Symbiotic Culture Of Bacteria and Yeast) needs to grow and ferment effectively. Black tea typically yields a robust, classic kombucha flavor, while green tea offers a lighter, crisper profile. Oolong tea strikes a delicious balance between the two. Experiment to find your personal preference!
- What to Avoid: Steer clear of flavored or herbal teas, especially those containing essential oils, artificial flavors, or added sweeteners. These can introduce compounds that are detrimental to the delicate balance of your SCOBY, potentially inhibiting fermentation or even harming the beneficial microbes. When considering the
best tea for kombucha brewing, simplicity is key.
The Sugar: Microbes’ Favorite Meal
Sugar is not just for sweetness; it’s the primary food source for the bacteria and yeast in your SCOBY. Don’t worry about consuming excessive sugar, as the magic of fermentation transforms most of it.
- Granulated White Sugar is Ideal: Simple, everyday granulated white sugar is highly recommended. It’s easily digestible by your SCOBY and provides a consistent food source. The beneficial microbes consume the sugar, converting it into organic acids, trace amounts of alcohol, and carbon dioxide. This means that by the time your
homemade kombuchais ready, most of the sugar will have been fermented out, leaving behind a tangy, complex beverage. - Sweeteners to Skip: Artificial sweeteners offer no nutritional value for your SCOBY and will not initiate fermentation. Similarly, while honey can be used for a distinct type of fermented tea called Jun kombucha (which uses a different SCOBY culture), it’s generally not suitable for traditional kombucha as its antimicrobial properties can harm a standard kombucha SCOBY. For a standard
kombucha recipe, stick with granulated white sugar.
The Water: A Clean Slate for Microbes
Water quality plays a surprisingly crucial role in the health of your fermented tea.
- Filtered or Dechlorinated Water is Crucial: Chlorine, a common additive in tap water, is designed to kill bacteria – including the beneficial bacteria you want to cultivate in your kombucha. Using chlorinated tap water can significantly hinder or even halt your fermentation process, leading to a weak or failed batch. If filtered water isn’t an option, simply let tap water sit uncovered for 24 hours to allow the chlorine to dissipate. This simple step is vital for ensuring your
what do I need to make kombuchachecklist is complete.
The SCOBY & Starter Tea: The Heart of Your Brew
These two components are absolutely vital for a successful kombucha recipe and are often overlooked in their importance.
- A Healthy SCOBY: Your SCOBY is the living culture that facilitates the fermentation. It’s a cellulose pellicle, often disc-shaped, that houses a diverse community of bacteria and yeast. A healthy SCOBY is typically light-colored, smooth, and may have some brown strands (which are normal yeast formations).
- Strong Starter Tea: Equally important is the starter tea – this is essentially pre-made, unflavored kombucha from a previous batch. The starter tea is acidic, which immediately lowers the pH of your fresh sweet tea, creating an environment hostile to harmful molds and bacteria, and welcoming to your beneficial microbes. This critical pH drop is your first line of defense against spoilage and ensures a vigorous start. Without sufficient starter tea, your brew may struggle to acidify properly, leading to potential issues and making
troubleshooting kombucha at homemuch more likely. A strong start also influenceshow long does kombucha take to ferment, often leading to a faster, more consistent brew.
By understanding and respecting the role of each of these core ingredients, you’re setting yourself up for a truly successful beginner kombucha recipe step by step experience. Proper SCOBY care begins with providing the best possible environment and nutrients.
Customization Options: Flavoring Your Homemade Kombucha
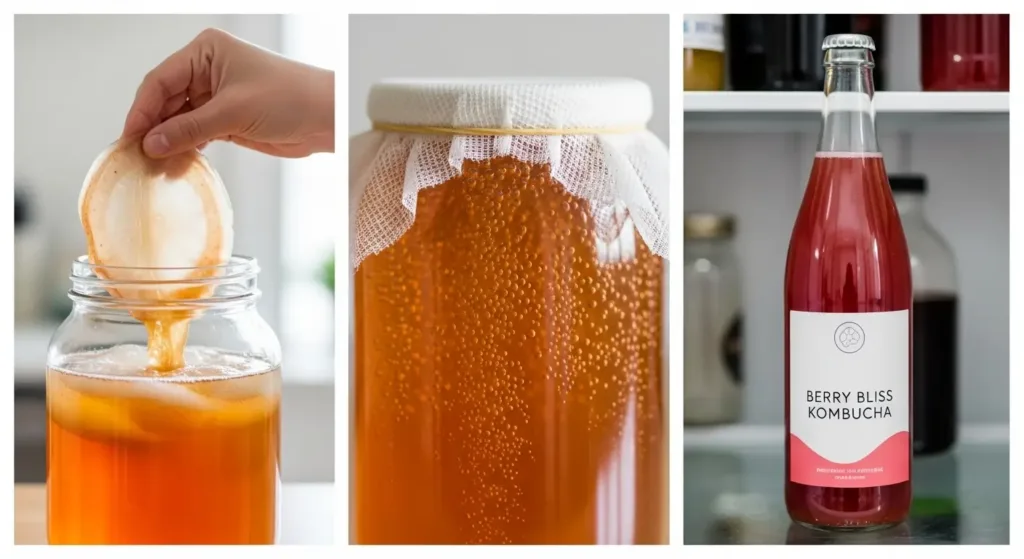
Once you’ve mastered the fundamentals of how to make kombucha at home – from preparing your sweet tea to nurturing your SCOBY through the primary fermentation – the exciting world of flavor customization awaits. This is where your homemade kombucha truly becomes a reflection of your palate. The key to vibrant flavors and satisfying fizz lies in the Second Fermentation (F2), a crucial step in any successful kombucha brewing journey.
During F2, you’ll transfer your finished plain fermented tea into airtight bottles, adding your chosen flavorings. The remaining yeast in the kombucha will consume the new sugars from your additions, producing carbon dioxide (CO2) which, when trapped, creates that beloved bubbly texture. This process also deepens and diversifies the flavor profile significantly.
Let’s explore the exciting options for your kombucha recipe:
Fruits: Fresh or Frozen, a Burst of Natural Sweetness
Fruits are perhaps the most popular choice for flavoring and are fantastic for beginners. They provide natural sugars for carbonation and infuse your homemade kombucha with delightful aromas and tastes.
- Berries (Fresh or Frozen): Strawberries, raspberries, blueberries, and blackberries are excellent. Muddle them slightly to release their juices, or use whole for a milder infusion. Frozen berries work just as well and are convenient to keep on hand.
- Citrus Slices: Lemon, lime, orange, or grapefruit add a bright, tangy kick. Be mindful of the pith, as it can impart bitterness. A few thin slices or a squeeze of juice is often enough.
- Apples: Diced or thinly sliced apples offer a crisp, subtly sweet flavor. Consider varieties like Granny Smith for a tart note or Fuji for a sweeter profile.
- Ginger: Fresh ginger, grated or thinly sliced, provides a wonderfully spicy and warming zest. It’s effective for carbonation, so a little goes a long way.
Juices: Consistent Flavor and Reliable Carbonation
Using fruit juices is an excellent way to achieve consistent flavor and predictable carbonation, especially when you’re just starting your beginner kombucha recipe step by step.
- Apple Juice: A classic choice, offering a clean, sweet base that pairs well with many other flavors.
- Grape Juice: Adds a rich, deep sweetness and often produces robust carbonation.
- Cherry Juice: Known for its striking color and distinct tart-sweet flavor, it makes a beautiful and delicious F2.
When using juices, aim for about 10-20% juice to kombucha ratio, adjusting to your taste preferences.
Herbs & Spices: Adding Complexity and Aroma
Don’t shy away from incorporating herbs and spices to elevate your homemade kombucha to gourmet levels. They can add incredible depth and sophisticated notes.
- Mint: Fresh mint leaves provide a refreshing, cooling sensation. Crush them gently before adding to release their essential oils.
- Basil: A surprising but delightful addition, basil offers a slightly peppery, aromatic twist, especially good with berries.
- Ginger: (Again!) Beyond its carbonating power, ginger’s pungent warmth is a fantastic standalone flavor or a complement to fruits.
- Cinnamon Sticks: Infuse a warm, comforting spice. A small piece of a stick is often sufficient.
- Vanilla Bean: For a luxurious, creamy sweetness, split a vanilla bean and add a small section to your bottle.
Combinations: Unleash Your Inner Alchemist
The real fun begins when you start combining different elements. Experimentation is highly encouraged at Fermention.com!
- Strawberry-Basil: A popular and refreshing duo, where the sweetness of strawberries meets the peppery aroma of basil.
- Ginger-Lemon: A zesty, invigorating, and carbonation-rich combination, perfect for a morning pick-me-up.
- Apple-Cinnamon: A comforting, autumnal blend that’s like a warm hug in a bottle.
- Blueberry-Mint: A bright and cooling combination that’s incredibly refreshing.
Don’t be afraid to try unique pairings. Your palate is your best guide!
The Second Fermentation (F2): Your Carbonation & Flavor Hub
The Second Fermentation is the stage explicitly designed for these flavor additions and carbonation build-up. After your primary fermentation is complete (typically 7-14 days, which answers “how long does kombucha take to ferment” for the first stage), you’ll carefully remove your SCOBY (ensuring proper SCOBY care by not introducing flavorings to it) and transfer the plain fermented tea into individual airtight bottles.
Add your chosen flavorings to each bottle, leaving about an inch or two of headspace. Seal the bottles tightly. Place them in a warm spot (ideally 68-78°F or 20-25°C) for 1-3 days. The exact duration will depend on the amount of sugar in your flavorings, the ambient temperature, and your desired level of fizziness.
It’s a good practice to “burp” your bottles daily by briefly opening and closing them to release excess pressure and prevent potential bottle explosions, especially if you’re new to kombucha brewing. When you’re happy with the carbonation and flavor, move your bottles to the refrigerator to halt the fermentation process.
If you find yourself troubleshooting kombucha at home and your F2 isn’t carbonating, consider adding a little more sugar (a teaspoon of fruit juice can often kickstart it) or moving your bottles to a warmer location. Remember, the quality of your base fermented tea also plays a role, so ensuring you’ve used the best tea for kombucha brewing from the start sets you up for successful F2 outcomes. Happy flavoring!

Serving & Storage: Enjoying Your Brew
Once your homemade kombucha has reached its peak flavor and effervescence, the moment to enjoy your fermented tea has arrived! For the most refreshing experience, always serve chilled. The cool temperature enhances the crisp, tangy notes you’ve worked to cultivate. If you’ve added fruits, herbs, or spices for a second fermentation (F2), you might prefer to strain them out before serving for a smoother drink, or leave them in for added visual appeal and texture—it’s entirely up to your personal taste.
Proper storage is key to preserving the appealing taste and beneficial qualities of your hard-earned brew. After completing your kombucha recipe (including any secondary fermentation), transfer your finished fermented tea into airtight bottles. Swing-top bottles are excellent for this purpose, as they create a strong seal that keeps carbonation locked in. Immediately store these bottles in the refrigerator. The cold temperature significantly slows down the fermentation process, preventing it from becoming too vinegary and maintaining that delightful fizz.
With proper refrigeration, your homemade kombucha is remarkably stable. It can typically last for several weeks to months in the fridge, gradually developing a more pronounced vinegar-like flavor over time. While it remains safe to drink for an extended period, the flavor profile will naturally evolve. Trust your senses – if it smells or tastes unpleasantly off, it’s best to discard it, though this is rare with correctly made kombucha.
One of the joys of how to make kombucha at home is the potential for a continuous supply! Your SCOBY (Symbiotic Culture Of Bacteria and Yeast) is a living, growing entity. To keep your kombucha brewing journey going after you’ve successfully completed your beginner kombucha recipe step by step, you have a couple of options. You can simply start a new batch regularly using a portion of your original SCOBY and some starter tea. Alternatively, if you need a break from kombucha brewing, you can create a SCOBY hotel. This involves storing your extra SCOBYs in a jar with plenty of strong starter tea in the refrigerator. This method is excellent for preserving your culture, ensuring you always have a healthy SCOBY ready when you ask yourself ‘what do I need to make kombucha’ next time. This diligent SCOBY care ensures your fermentation adventure continues seamlessly.
Finally, a word on carbonation – the delightful fizz that brings your homemade kombucha to life! Especially after a secondary fermentation, your bottles can become quite pressurized. To prevent any ‘kombucha volcanoes’ or messy overflows, always open bottles slowly over a sink. A gentle twist of the cap, listening for the hiss, and allowing any initial foam to subside before fully opening will save you from a sticky situation. This is a common point where people might look for ‘troubleshooting kombucha at home,’ but a little caution goes a long way here! Enjoy the fruits of your fermentation labor!

Troubleshooting Guide: Common Kombucha Challenges
Embarking on the journey of how to make kombucha at home is a rewarding experience, filled with the satisfaction of creating your own flavorful, fermented tea. However, like any living process, kombucha brewing can present a few head-scratchers. Don’t worry, these common issues are usually easy to diagnose and even easier to prevent in future batches. We’re here to help you confidently navigate your homemade kombucha adventure, ensuring optimal SCOBY care and delicious results.
No Fermentation Activity
You’ve set up your kombucha recipe, you’re patiently waiting, but nothing seems to be happening. No bubbles, no distinct tangy aroma developing. This can be puzzling, especially when you’re following a beginner kombucha recipe step by step.
- Check the Temperature: The most frequent culprit! Your SCOBY thrives in a cozy environment, ideally between 68-78°F (20-26°C). If your brewing space is too cool (below 65°F), the beneficial bacteria and yeast will slow their activity significantly. Relocate your brew to a warmer spot.
- Strong Starter Tea is Key: Did you use enough potent starter tea? This crucial liquid lowers the pH of your sweet tea quickly, creating an acidic environment that inhibits harmful microbes and kickstarts your fermentation. Aim for at least 1-2 cups of unpasteurized, unflavored kombucha per gallon of sweet tea.
- Avoid Chlorinated Water: Chlorine, while great for purifying tap water, is detrimental to the delicate microbes in your SCOBY. It will kill beneficial bacteria, hindering fermentation. Always use filtered or dechlorinated water for your kombucha brewing. If in doubt, let tap water sit uncovered for 24 hours to allow chlorine to dissipate.
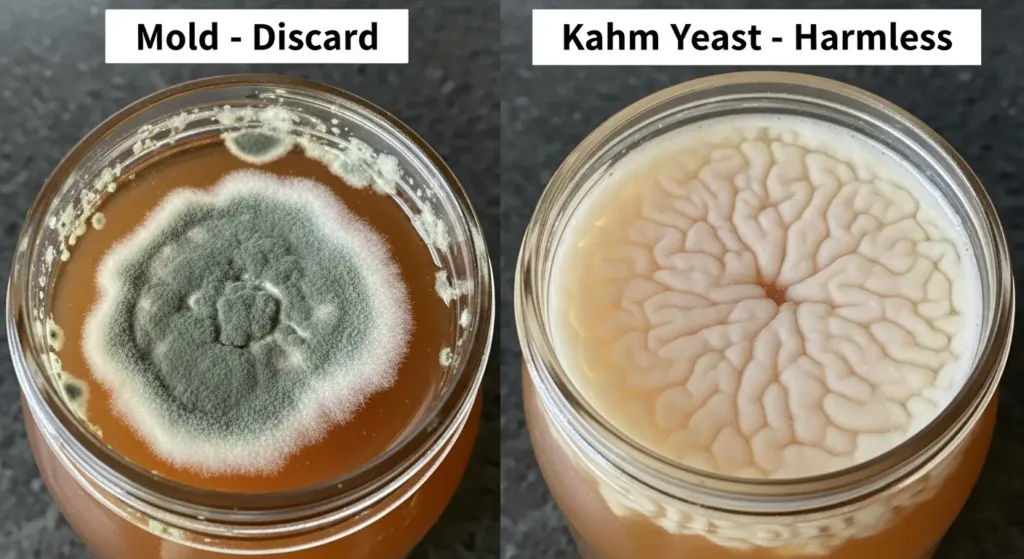
Mold
This is the most critical issue to identify correctly.
- Identification: Mold will appear as fuzzy, dry, and often circular patches on the surface of your fermented tea. It can be various colors: green, black, blue, or even white and fuzzy (distinct from Kahm yeast).
- Action: This is an IMMEDIATE RED FLAG. DISCARD THE ENTIRE BATCH without hesitation. Do not attempt to salvage it. Mold indicates contamination, and the spores can extend throughout the liquid, even if you only see surface growth.
- Prevention: Ensure all your equipment is meticulously clean and sanitized. Use enough strong starter tea to rapidly acidify the brew. Maintain optimal fermentation temperatures to give your SCOBY the best chance to outcompete unwanted invaders.
Kahm Yeast
Often mistaken for mold, Kahm yeast is generally harmless but can be a visual deterrent.
- Identification: Kahm yeast presents as a flat, white, wrinkly, or sometimes slimy film that forms on the surface of your homemade kombucha. It is distinctly not fuzzy. It often covers the entire surface rather than appearing in isolated, circular spots like mold. While it might look a bit strange, it’s simply a wild yeast that’s found its way into your brew.
- Action: Your brew is still safe to consume. Gently skim the Kahm yeast off the surface with a clean spoon. While it won’t harm you, it can sometimes impart a slightly off-flavor if left too long.
- Prevention: Kahm yeast often appears when there’s too much oxygen exposure or if your starter tea wasn’t strong enough. Ensuring a healthy, robust SCOBY and adequate starter can help prevent its formation.
Too Sour/Vinegary
You’ve waited patiently, perhaps asking yourself “how long does kombucha take to ferment,” only to find your brew has developed a sharp, intensely tangy, almost vinegar-like flavor.
- Cause: Your fermented tea has simply fermented for too long during the First Fermentation (F1). The beneficial bacteria and yeast have converted most of the sugar into acids, resulting in a very low pH and a pronounced sour taste.
- Solution for Next Batch: Reduce your F1 time. Start tasting your homemade kombucha daily after about 5-7 days of fermentation, or even earlier if your brewing environment is particularly warm. Your palate is your best guide to achieving your desired balance of sweetness and complex tang.
- Repurposing: Don’t discard this batch! Over-fermented kombucha makes excellent vinegar for salad dressings, marinades, or even as a natural cleaning solution. It’s a testament to the robust nature of SCOBY care!
Not Carbonated
You’ve completed your F1 and F2, eagerly anticipating that satisfying fizz, only to find your homemade kombucha is flat.
- Airtight Bottles are Essential: For carbonation to build, the CO2 produced during the Second Fermentation (F2) needs to be trapped. Ensure you’re using pressure-rated, truly airtight bottles, such as swing-top bottles. Standard screw-top jars are not suitable for F2.
- Sugar/Fruit for F2: The yeast needs a food source to produce CO2 in F2. If your F1 was very long and sour, there might not be enough residual sugar. Adding fruit juice (about 10-20% of bottle volume), fresh fruit, or a small amount of sugar (1-2 teaspoons per 16oz bottle) will give the yeast something to ferment.
- Allow More Time for F2: Carbonation takes time. F2 typically takes 2-5 days at room temperature (68-75°F / 20-24°C). If your brewing space is cooler, it will take longer. Be patient, and consider gently “burping” (briefly opening and re-sealing) a bottle to check carbonation levels without over-pressurizing. This is a common part of troubleshooting kombucha at home.
With these tips, you’ll be well-equipped to tackle common kombucha brewing challenges and consistently produce delicious, fizzy, homemade kombucha that perfectly suits your taste!
Images Guide: Brewing Kombucha Step-by-Step
Frequently Asked Questions About Kombucha Brewing
What is a SCOBY and where do I get one?
A SCOBY, an acronym for “Symbiotic Culture of Bacteria and Yeast,” is the living heart of your homemade kombucha. It’s a thick, gelatinous disc that floats on top of your fermented tea, though it can also sink (more on that later!). This incredible culture is responsible for transforming sweetened tea into the tangy, probiotic-rich beverage we all love. Essentially, it’s a thriving community of beneficial bacteria and yeasts that work together to convert sugars into organic acids, trace alcohol, and carbon dioxide, giving kombucha its unique flavor and fizz.
If you’re wondering what do I need to make kombucha and where to find this essential ingredient for your beginner kombucha recipe step by step, you have a few excellent options for acquiring a healthy SCOBY:
- From a friend: Many experienced brewers are happy to share their “mother” SCOBYs, which grow with each batch.
- Online retailers: Reputable sources sell dehydrated or live SCOBYs, often bundled with a strong starter tea.
- Kombucha brewing starter kits: These kits typically include a SCOBY, starter tea, and often the basic equipment you need to get started on how to make kombucha at home. Proper SCOBY care is crucial for a successful brew, so always ensure your SCOBY comes from a clean, healthy source.
Can I use honey instead of sugar when learning how to make kombucha at home?
While it might seem like a healthier alternative, traditional kombucha brewing relies specifically on refined cane sugar for a reason. The beneficial bacteria and yeasts in a typical kombucha SCOBY are highly adapted to metabolize the glucose and fructose found in table sugar. Honey, with its different sugar profile and unique antimicrobial properties, can actually inhibit or alter the specific microbial balance required for a classic kombucha recipe.
If you’re keen on using honey, you’re likely looking for Jun kombucha! Jun is a distinct type of fermented tea that thrives on green tea and honey. It requires a different, specialized SCOBY culture adapted to these ingredients. Attempting to use honey with a traditional kombucha SCOBY can lead to an unsuccessful brew, a weak SCOBY, or even mold. For your homemade kombucha, stick to the tried-and-true sugar for the best results, ensuring your culture remains robust and healthy.
How do I know if my kombucha is safe to drink?
Safety is paramount in all fermentation, and homemade kombucha is no exception. Trusting your senses is your best tool for troubleshooting kombucha at home:
- Visual Check: The most important indicator. Look for fuzzy, dry mold. Mold can appear as green, black, white, or pink fuzzy spots on the surface of your SCOBY or the tea. If you see any fuzzy mold, discard the entire batch immediately. A healthy brew might have a new, translucent SCOBY forming on top, stringy brown bits floating in the liquid, or a harmless, slimy white film called Kahm yeast – these are normal.
- Smell Test: A healthy fermented tea should smell pleasantly tangy, vinegary, or even slightly fruity. If it smells putrid, like rotten eggs, sewage, or overly yeasty (like strong beer), it’s a red flag.
- Taste Test: After about 5-7 days (depending on ambient temperature and how long does kombucha take to ferment), your kombucha should begin to taste tangy and slightly sweet. As it ferments longer, it will become more sour and vinegary. If it tastes off, bitter, or otherwise unpleasant, it’s best to err on the side of caution and discard it.
A healthy kombucha brew creates an acidic environment (pH typically between 2.5-3.5) that inhibits harmful pathogens. By regularly checking for fuzzy mold, off-smells, and unpleasant tastes, you can confidently enjoy your homemade kombucha.
My SCOBY sank, is that normal?
Absolutely! It’s a very common question for anyone learning how to make kombucha at home, and the answer is a resounding yes, it’s completely normal for your SCOBY to sink. The position of the original SCOBY (often called the “mother”) has no bearing on the success of your kombucha brewing process.
The magic of fermentation happens throughout the entire liquid, not just at the surface. What you will notice, and what is a true indicator of a healthy ferment, is the formation of a new SCOBY (a pellicle) on the surface of your fermented tea. This new layer, which can be thin and translucent at first, acts as a protective barrier, keeping oxygen out and allowing the beneficial bacteria and yeasts to thrive. So, don’t worry if your “mother” takes a dive; as long as you see a new pellicle forming and bubbling activity, your homemade kombucha is well on its way!
How much alcohol is in homemade kombucha?
Homemade kombucha, as a fermented tea, naturally contains a trace amount of alcohol due to the yeast’s activity during the kombucha brewing process. However, this amount is typically very low, generally ranging from 0.5% to 1.5% alcohol by volume (ABV). This level is low enough that kombucha is legally classified as a non-alcoholic beverage in many regions (which usually requires less than 0.5% ABV).
Factors like the amount of sugar, the type of tea used (best tea for kombucha brewing is usually black tea for the first ferment), and especially how long does kombucha take to ferment can influence the final alcohol content. A longer fermentation period or warmer temperatures can lead to a slightly higher ABV. While it’s possible to increase the alcohol content through specific secondary fermentation techniques or by adding more sugar, a standard beginner kombucha recipe step by step for homemade kombucha will result in a refreshing beverage with only minimal alcohol.
Important Health & Safety Information
Medical Disclaimer: This content is for educational purposes only and is not intended as medical advice. Fermented foods may interact with medications or health conditions. Consult your healthcare provider before making significant dietary changes, especially if you have autoimmune conditions, are pregnant, nursing, or taking medications.
Food Safety Notice: Fermentation carries inherent risks if not performed correctly. Always follow proper sanitation procedures, monitor pH levels when specified, and trust your senses. When in doubt, discard your ferment. The publishers are not responsible for adverse effects from following these instructions.