I get it. You’ve seen the beautiful loaves, scrolled past the perfect Instagram posts, and thought, “I can do that!” Only to find yourself staring at your sourdough starter—now a jar of grey liquid or, worse, something fuzzy—wondering if you’re cursed.
I used to panic about this too. My first five starters died. One grew something that looked like a horror movie. My kitchen felt less like a bakery and more like a graveyard for ambitious hobbies.
But what if I told you that you’re not dumb, you’re just busy? The secrets to a thriving sourdough starter are simpler than you think. It’s about understanding your starter’s real needs and fitting them into your real life.
🚀 Your Fermention Promise: Bullet-Proof Guarantees 🚀
- No More Guesswork: Clear, actionable steps for every stage of your starter’s life.
- Schedule-Proof Solutions: Adaptable feeding routines for 9-5ers, night-shifters, and weekend warriors.
- Climate Confidence: Master your starter, no matter if it’s a frosty winter or a sweltering summer.
- Zero-Waste Joy: Transform your discard into delicious, guilt-free treats.
- Visual Peace of Mind: Learn to spot the difference between healthy activity and when to toss it.
Table of Contents
- The Essential Tools (And What You Can Skip)
- Schedule Mastery: Feeding Your Starter Around *Your* Life
- Troubleshooting Panic: What’s Really Going on in That Jar?
- Climate Adjustments: Happy Starter, Happy Kitchen
- Zero-Waste Discard Ideas You’ll Actually Use
- You Just Unlocked Level 1: Your Sourdough Journey Begins!
The Essential Tools (And What You Can Skip)
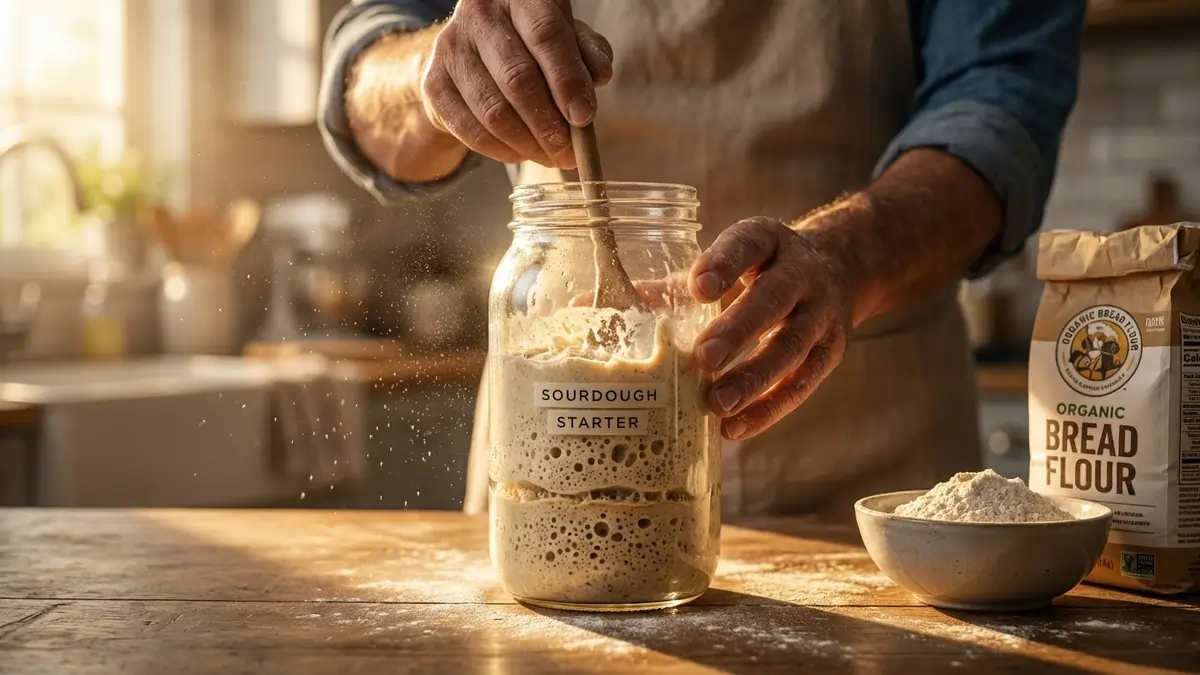
Before we dive into the nitty-gritty of keeping your sourdough starter alive, let’s talk gear. You don’t need a fancy artisanal shop full of gadgets. In fact, many common sourdough starter problems come from overcomplicating things.
What You Actually Need:
- A Jar: A wide-mouth glass jar (pint or quart/0.5-1 liter) works best for easy feeding and cleaning. Don’t seal it airtight! Your starter needs to breathe. A loose lid or a piece of cloth secured with a rubber band is perfect. Check out our guide to essential sourdough tools for specific recommendations.
- Kitchen Scale: This is non-negotiable for consistent results. Measuring by weight (grams) is far more accurate than cups. This ensures a healthy starter every time.
- Flour: Unbleached all-purpose or bread flour is ideal to get started. Later, you can experiment with rye or whole wheat for different flavors.
- Water: Unchlorinated, room-temperature water. Tap water is often fine if you let it sit out for an hour or so, allowing chlorine to evaporate.
- Spatula or Spoon: For mixing.
What You Can Skip (For Now):
- Dough Whisk: Nice to have, but a fork works just as well.
- Proofing Baskets (Bannetons): Essential for baking, but not for maintaining your starter.
- Fancy Thermometers: A basic kitchen thermometer is useful, but not critical for starter maintenance.
When you wake up tomorrow and see your simple setup working its magic, you’ll feel like a wizard. I still do.
Schedule Mastery: Feeding Your Starter Around Your Life
“I’m a nurse. 12-hour shifts. Feeding twice a day is a fantasy.” – Aisha.
Yep, Aisha, I hear you. The traditional “feed every 12 hours” advice is for people who live in a bread-baking monastery. For the rest of us, it’s a recipe for failure and frustration.
The key to a happy, active starter is understanding its rhythm and how to manipulate it to fit your feeding schedule.
The Basics of Feeding (When You Can Feed):
- Ratio: Typically, 1:1:1 (starter:flour:water by weight). So, if you keep 50g of starter, you’d feed it 50g flour and 50g water. King Arthur’s test kitchen calls 1:1:1 the “gold standard” for beginners — full ratio & schedule guide here.
- Remove Discard: Always remove most of your old starter before feeding, leaving only a small amount (e.g., 20-30g). This prevents your starter from becoming too large and ensures it has enough “food.”
Adapting to Your Schedule:
- The “I Work 9-5” Method:
- Morning Feed (before work): Feed your starter. It will peak while you’re at the office.
- Evening Feed (after work): Feed it again. It might be a little hungry, but it will be fine.
- Weekend Buffer: On weekends, you can feed more regularly or even put it in the fridge if you need a break.
- The “Night Shift / Irregular Hours” Method:
- Refrigeration is Your Best Friend: Your refrigerator slows down fermentation significantly. Feed your starter, let it get active for 1–2 hours at room temperature (68–75 °F / 20–24 °C), then pop it in the fridge. King Arthur confirms it can easily last 7–14 days cold — see their fridge revival method.
- Reviving: When you’re ready to bake or want to feed it, take it out, let it come to room temperature, feed it, and let it become active. You might need 1-2 regular feeds before it’s super bubbly. This is perfect for a cold ferment approach.
- The “Weekend-Only Baker” Method:
- Keep your starter in the fridge most of the week.
- Take it out Friday evening, feed it.
- Feed it again Saturday morning, let it peak, then use it for baking.
- Feed any leftover starter, let it become active for a couple of hours, then back to the fridge until next weekend.
Remember, a healthy starter is resilient. I still grin like an idiot when I see a cold-stored starter bubble back to life after a week in the fridge.
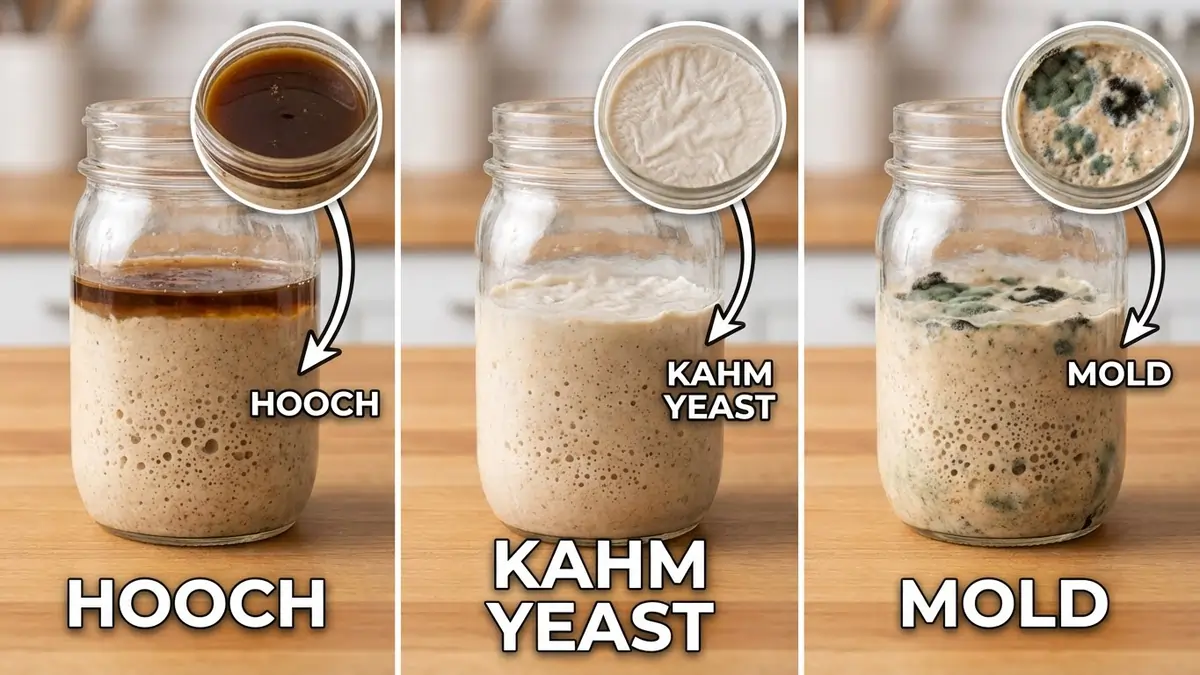
Troubleshooting Panic: What’s Really Going on in That Jar?
“I came home to black liquid and almost cried. My husband asked if we should call a priest.” – Lisa, Chicago.
Lisa, you’re not alone! The fear of “what is that weird stuff?!” is real. Many beginners abandon their sourdough starter at the first sign of something unexpected. You’re not dumb, you’re just seeing the natural (and sometimes funky) stages of fermentation. Let’s demystify some common sights.
1. Hooch (The “Black Liquid” Lisa Saw):
- Appearance: A dark liquid (can be clear, grey, brown, or even black) on top of your starter.
- What it is: A byproduct of hungry yeast. It means your starter needs a feed! Darker hooch means it’s very hungry.
- Action: Pour it off (or stir it in for a stronger flavor), then feed your starter as usual. It’s usually harmless.
- Verdict: Normal.
2. Kahm Yeast (The “Horror Movie” James Saw):
- Appearance: A white, sometimes wrinkly or dusty-looking film on the surface. It often looks like a thin skin, not fuzzy. It might smell yeasty or slightly vinegary, but not foul.
- What it is: A harmless, aerobic yeast that sometimes forms on fermented foods. It competes with your starter’s yeast but isn’t dangerous.
- Action: Scrape it off, remove a good portion of the starter underneath, and feed the remaining healthy starter. Ensure your jar isn’t sealed too tightly, as kahm yeast loves oxygen. For maximum safety (especially for children, elderly, or immunocompromised), discard the starter and begin again with a clean jar.
- Verdict: Usually harmless, but indicates it’s time for a good cleaning and feed.
3. Mold (The Real Danger):
-
- Appearance: Fuzzy, usually colored (pink, red, orange, green, black). It will look like actual mold you’d find on old bread or fruit. It often has a distinct, unpleasant, musty smell.
- What it is: Harmful fungi.
- Action: Discard the entire batch immediately and sterilize the jar thoroughly with hot soapy water or boiling water. Do not attempt to salvage any portion. Clean and sterilize your jar thoroughly before starting anew.
- Verdict: DANGER.
Climate Adjustments: Happy Starter, Happy Kitchen
Your sourdough starter is a living organism, and like us, it’s sensitive to temperature. What works in a chilly Alaskan winter won’t fly in a humid Florida summer. Understanding how to adjust for your local climate is key to a consistent, active starter.
Cold Winters (Below 68°F / 20°C):
- Problem: Slower fermentation, sluggish starter, more hooch.
- Solution:
- Warmer Spot: Find the warmest spot in your kitchen. On top of the fridge, in the oven (turned off, with the light on for gentle warmth), or in a proofing box. Aim for 75-80°F (24-27°C).
- Warmer Water: Use slightly warmer water (around 80-85°F / 27-29°C) when feeding. This gives the yeast a head start.
- Rye Flour Boost: A small amount of rye flour (e.g., 10-20% of your total flour) can give a sluggish starter a boost, as rye is rich in nutrients that yeast love.
Hot & Humid Summers (Above 78°F / 26°C):
- Problem: Over-fermentation, very quick rise and fall, sour starter, can attract fruit flies.
- Solution:
- Cooler Spot: Move your starter to the coolest spot in your house – the pantry floor, a basement, or even a cooler section of your countertop. Aim for 68-72°F (20-22°C).
- Colder Water: Use colder water (straight from the tap, around 60-65°F / 15-18°C) when feeding. This helps slow down fermentation.
- Increase Feed Ratio: Instead of 1:1:1, try 1:2:2 (starter:flour:water) or even 1:3:3. More food will last longer in a warm environment.
- Refrigeration: If it’s consistently very hot, consider storing your starter in the fridge more frequently and bringing it out only when you need to bake. This is a great way to maintain a healthy starter in challenging conditions.
I used to panic about my starter going dormant in winter or turning into vinegar in summer. Now, I simply adjust my feeding schedule and water temperature.
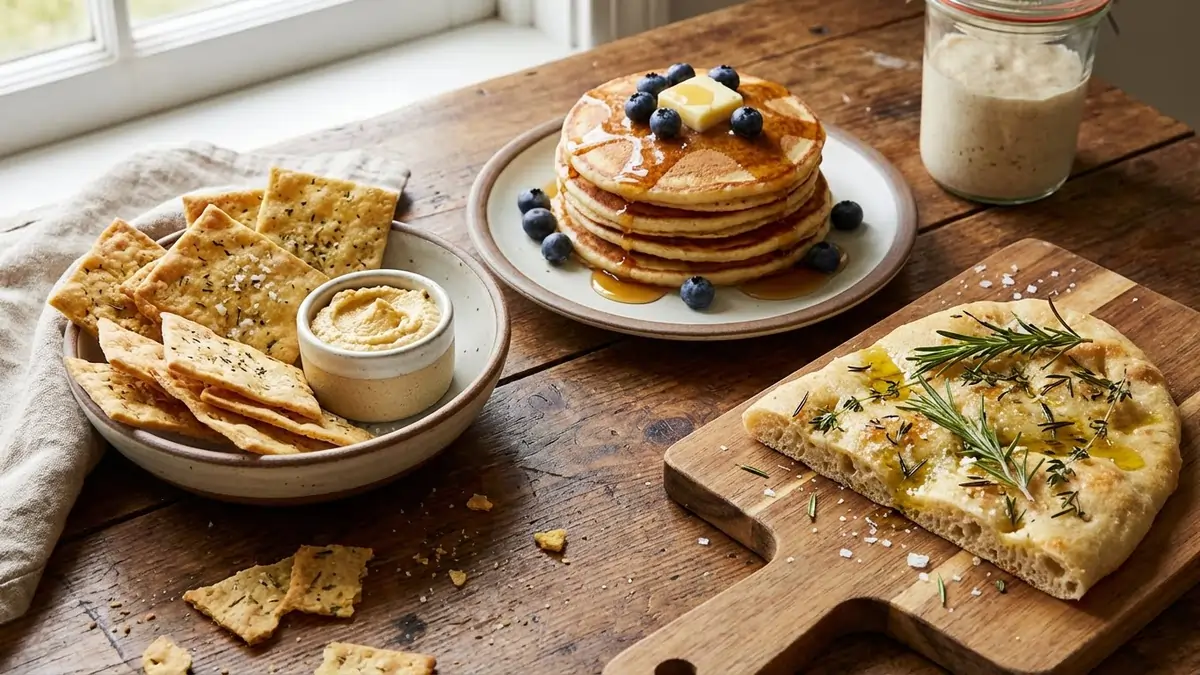
Zero-Waste Discard Ideas You’ll Actually Use
“I threw away so much discard I felt like a criminal.” – Sarah, Denver.
Sarah, I’ve been there! Watching all that perfectly good flour and water go down the drain feels wasteful.
The good news? Your sourdough starter discard isn’t waste; it’s a secret ingredient! It adds a lovely tang and tenderness to baked goods without the need for additional leavening.
This section isn’t just about reducing waste; it’s about expanding your baking repertoire with creative sourdough discard recipes.
Here are some actual, delicious, and easy-to-make recipes for your discard:
- Crispy Discard Crackers:
- Mix equal parts discard and flour, a splash of olive oil, and salt. Roll it super thin, cut into shapes, and bake until crisp. Perfect for cheese and dips.
- Fluffy Discard Pancakes/Waffles:
- Swap out some of the liquid in your favorite pancake or waffle recipe for discard. The tang adds a fantastic depth of flavor. Let the batter sit for 30 minutes for an extra boost.
- Quick Discard Flatbread/Pizza Crust:
- Combine discard with a bit more flour, water, salt, and a pinch of baking powder/soda. Knead briefly, let it rest, then roll out for a quick, flavorful flatbread or thin-crust pizza.
- Tender Discard Biscuits:
- Use discard instead of buttermilk in a biscuit recipe. The acidity tenderizes the dough and adds a subtle tang.
These recipes are quick, require minimal effort, and ensure you never feel like a “criminal” again. I still grin like an idiot when I turn what used to be “waste” into a delicious snack.
You Just Unlocked Level 1: Your Sourdough Journey Begins!
Congratulations, Sourdough Master!
You’ve just gained the confidence to tackle your sourdough starter head-on. No more panicking about hooch, no more fear of feeding schedules, and definitely no more feeling guilty about discard. You now have the blueprints for a thriving starter, tailored to your real life. This is just the beginning. Ready to turn that lively starter into your first perfect loaf? Or perhaps explore more advanced techniques like long cold ferments and shaping? We’ve got a whole library of next-level courses and guides waiting for you. Click here to explore our advanced sourdough courses and truly master the art of baking!From the Fermention Team
About the Author: The Fermention Team is dedicated to simplifying the art of fermentation for home cooks everywhere. We combine scientific precision with real-world practicality.